FAQs
1. Getting Started
What is the Presta Portal (accounts.presta.co.ke)?
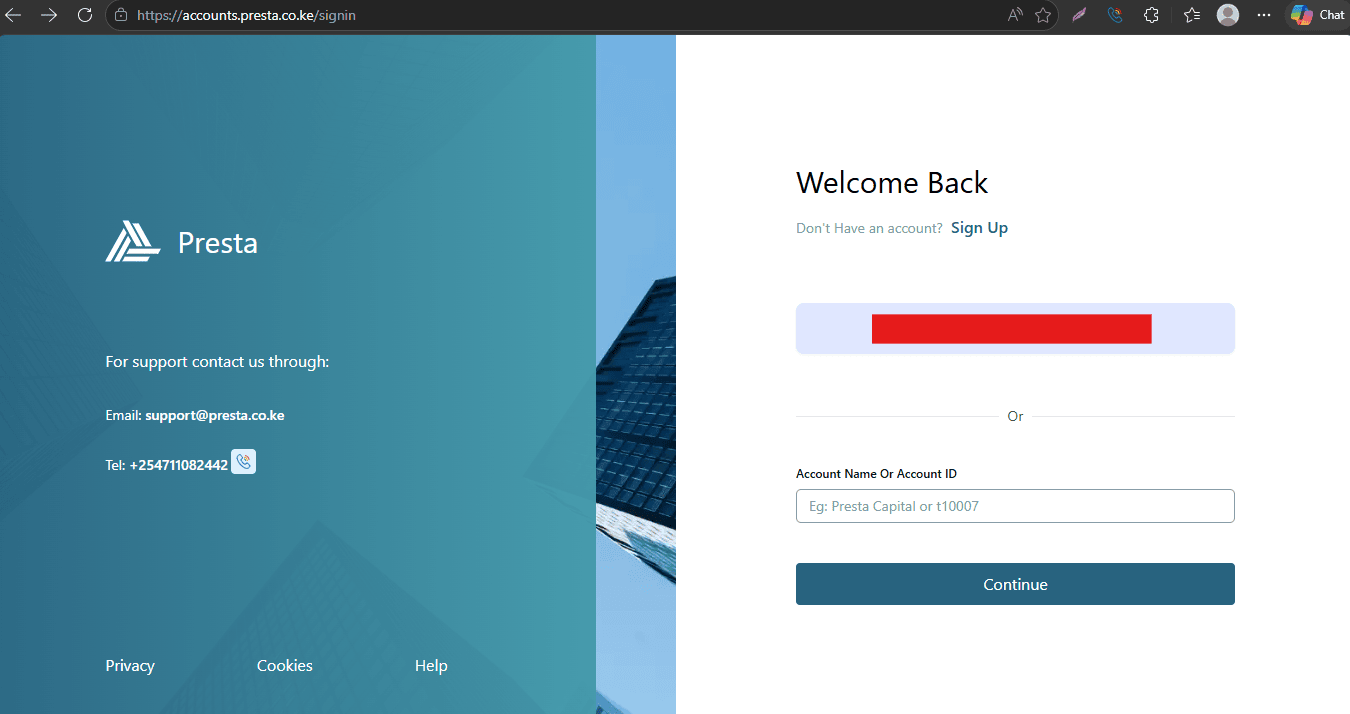
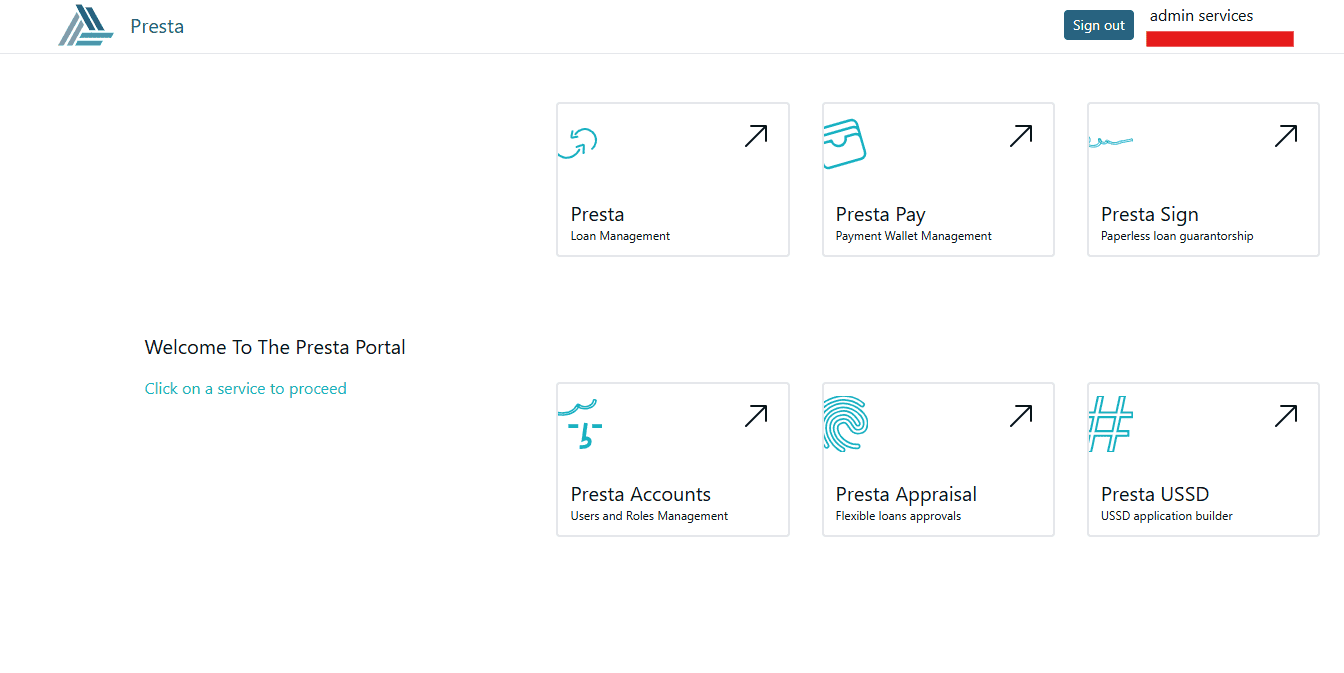
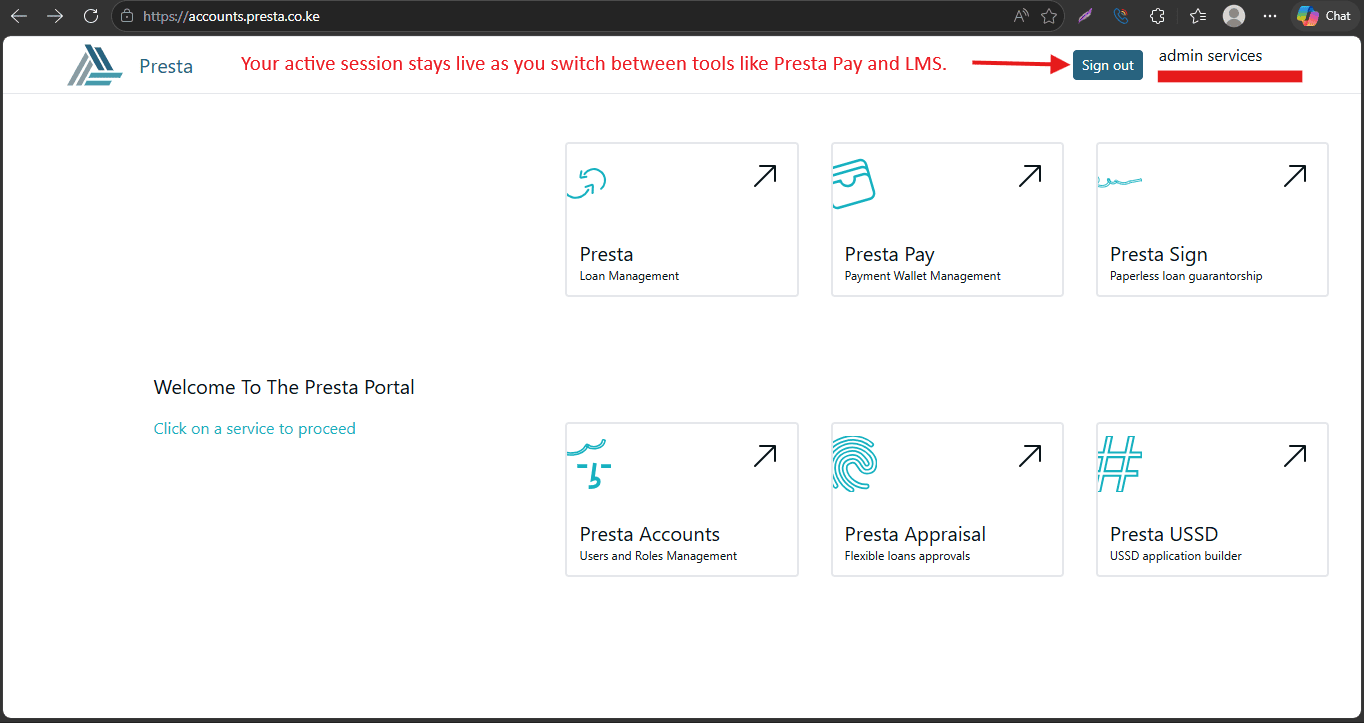
The Presta Portal is your central hub. It's a single dashboard where all your Presta services are located. Instead of having different links for different tasks, you log in to the Portal once and see "tiles" for all the modules your institution has subscribed to.
What are the different service modules available in the Portal (e.g., Presta Pay, Presta Sign)?
Depending on your subscription, you will see specialized tools such as:
- Presta LMS: For core loan management and user roles.
- Presta Pay: For managing disbursements and your payment wallet.
- Presta Sign: For paperless, digital signatures from guarantors.
- Presta Appraisal: For automated and flexible loan evaluation.
- Presta USSD: For managing your keypad-based mobile services.
What is the Presta Loan Management System?
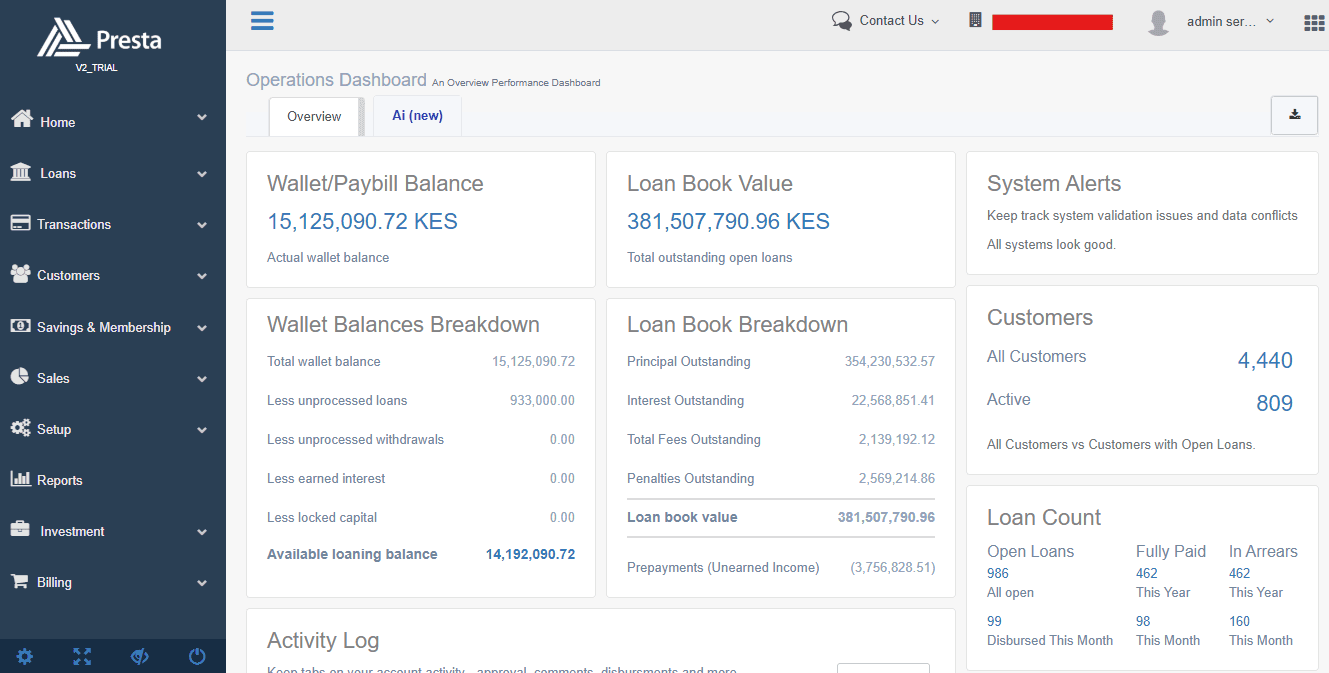
The Presta Loan Management System (LMS) is a digital platform designed to help lenders automate their entire business. Instead of using paper and manual spreadsheets, you can use our dashboard to manage everything, from registering new customers and approving loans to tracking repayments and generating reports. It is built to make lending faster, safer, and more organized.
Who can use Presta LMS?
The system is specifically built for financial institutions that offer credit. This includes:
- SACCOs (Savings and Credit Co-operative Societies)
- Microfinance Institutions (MFIs)
- Digital Lenders and private credit companies
- Investment Groups looking for structured loan management.
How do we get access to the system?
Once your institution is officially onboarded, our team will set up your secure environment. You will receive an invitation email with:
- Your unique platform URL (link).
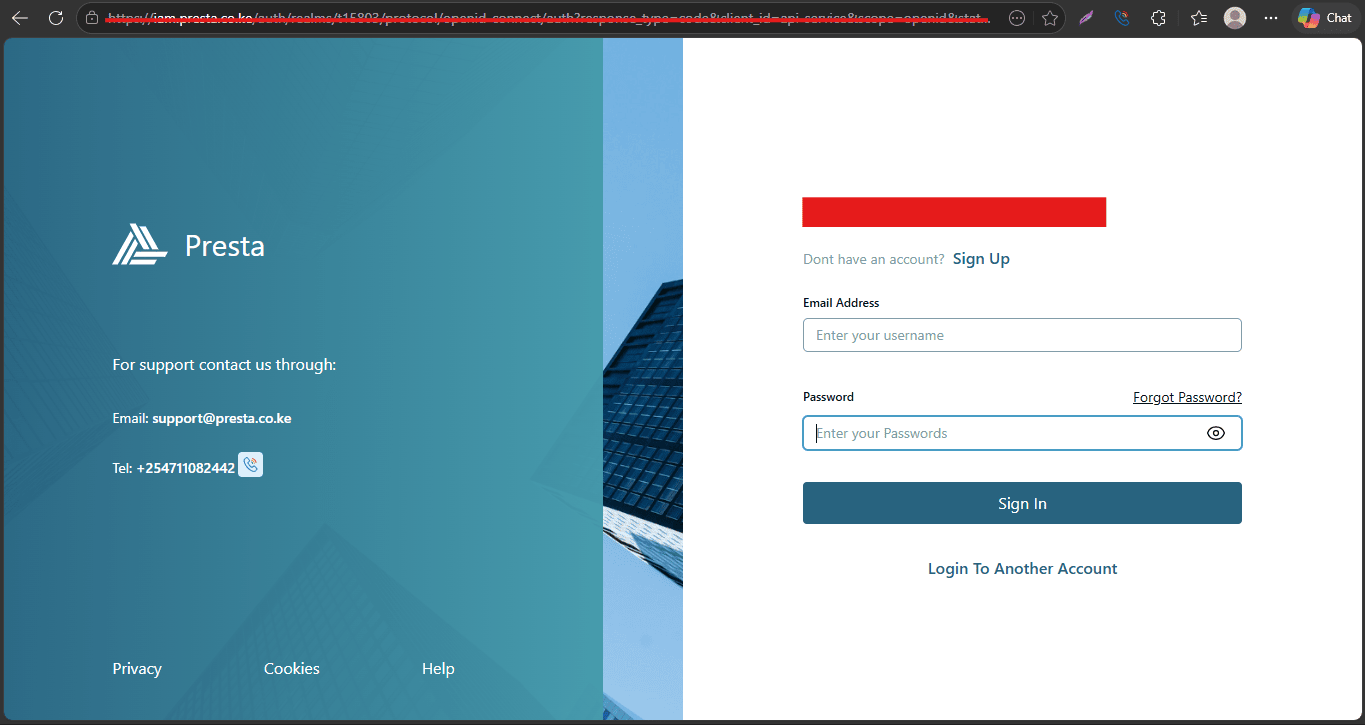
- Your initial Login Credentials (Username and Password).
- Access to the Presta Portal, where you can find all your active modules.
Do I need a different login for each service module?
No. The Presta Portal uses Single Sign-On (SSO). This means you only need one username and password. Once you are logged into the main portal, you can jump between Presta Pay, Presta Sign, and Presta LMS without having to log in again.
What are the system requirements?
Presta is a cloud-based service, so you don't need to buy expensive servers or install software. You only need:
- A Computer: A laptop or desktop with a modern browser (Google Chrome is highly recommended).
- Internet: A stable internet connection (4G or Fiber is best for real-time transactions).
- Mobile Devices: For your customers to use the system via App (Android/iOS) or USSD (any basic phone).
Do you offer training during onboarding?
Yes. We ensure your team is fully confident before you go live. Our onboarding process includes:
- Admin Training: For your IT and system managers.
- User Training: For credit officers and accountants on their daily tasks.
- Guides: Digital manuals and "How-To" resources for future reference.
2. System Configuration
What is the "Presta Accounts" module specifically used for?
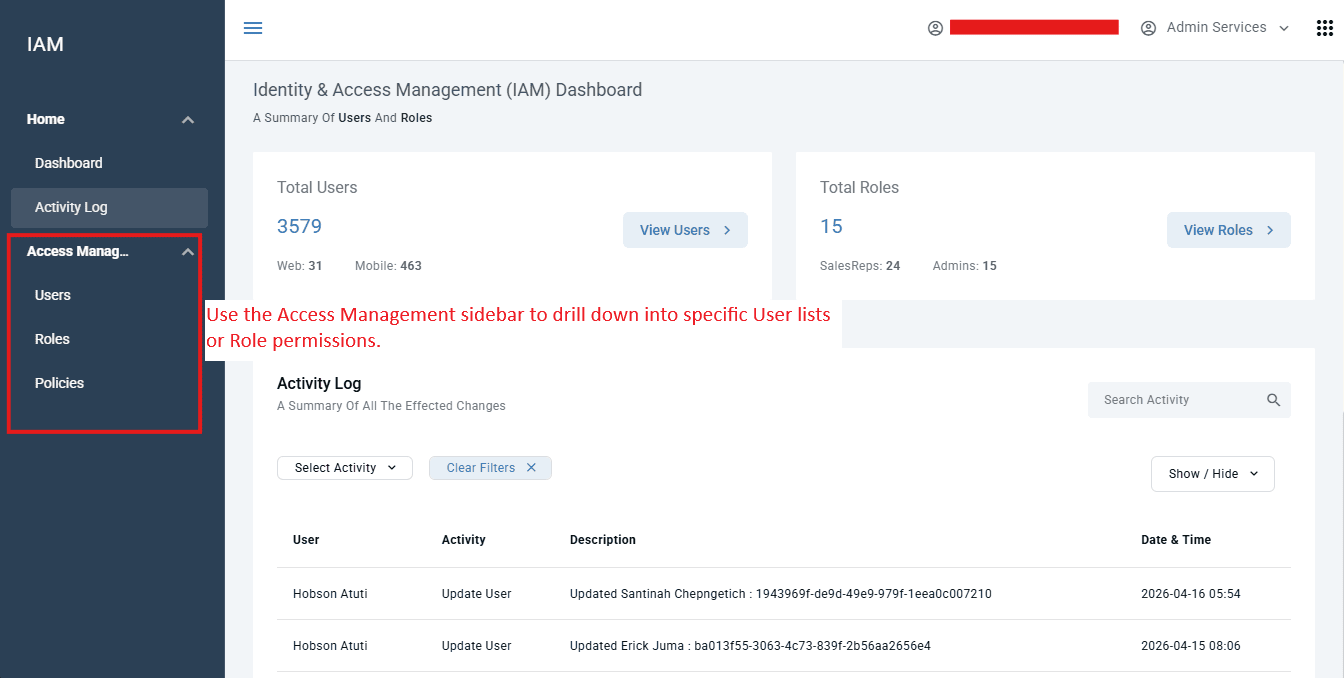
The Presta Accounts module is your institution's central hub for Identity & Access Management (IAM). It is used to manage the "who" and "how" of your system. Specifically, creating staff accounts, defining their permission levels (Roles), and monitoring security via the system-wide Activity Log.
How do I switch between different services once I am logged in?
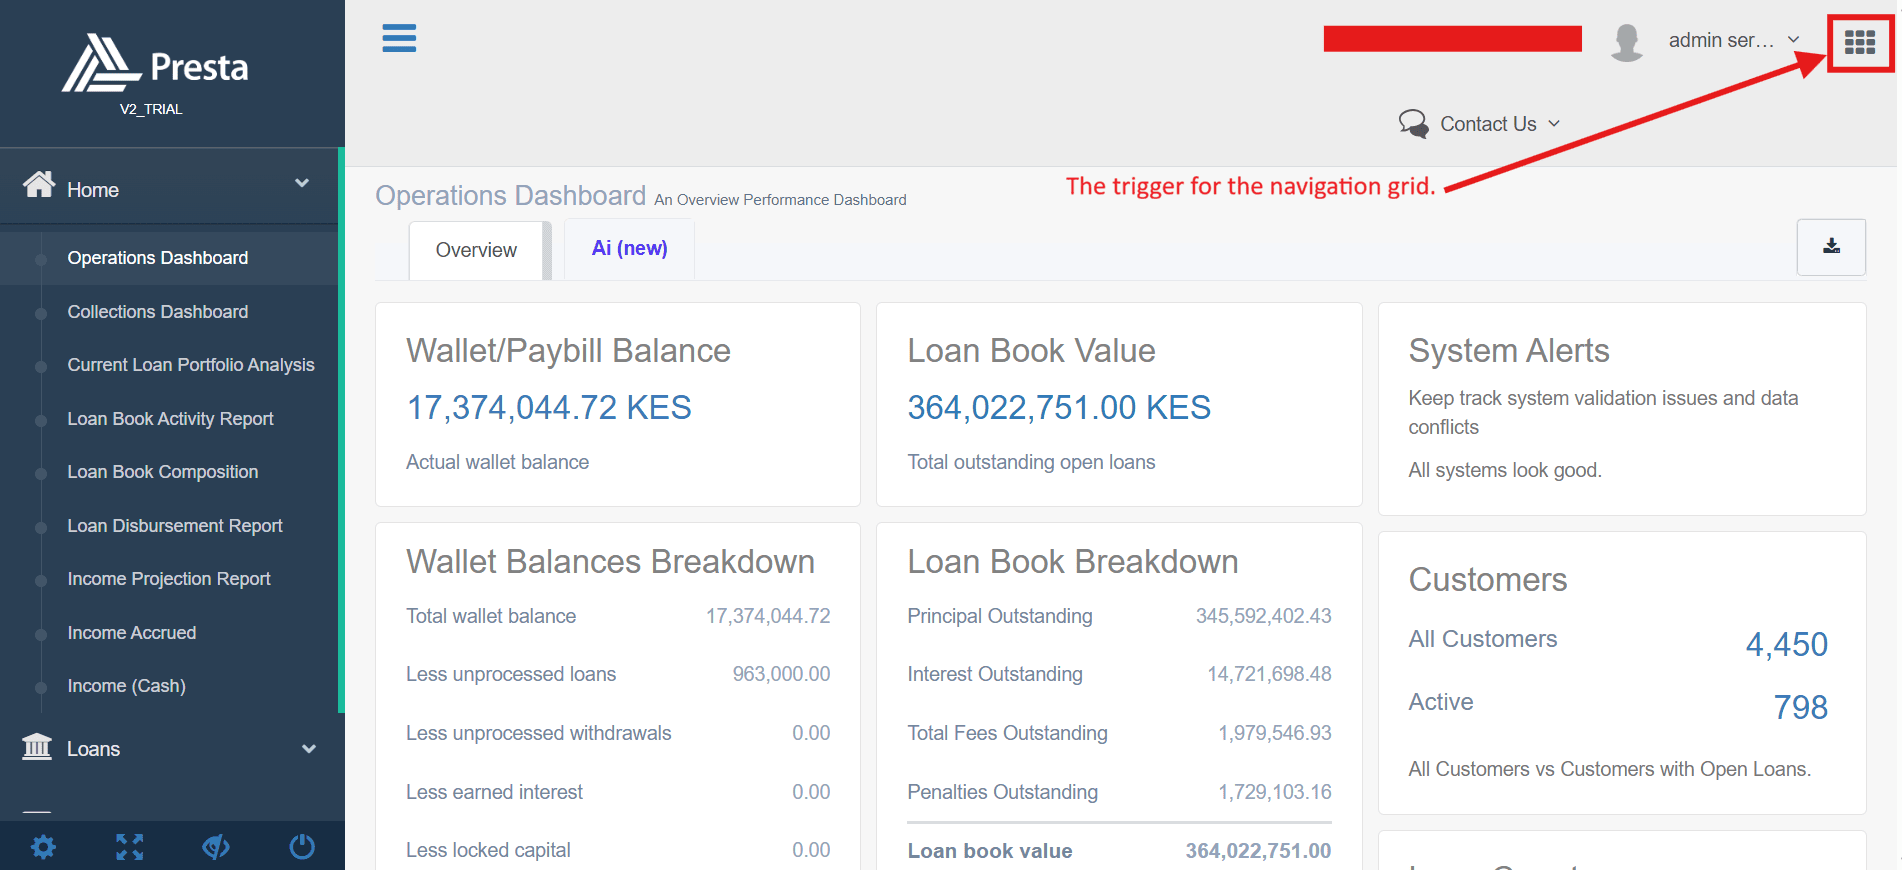
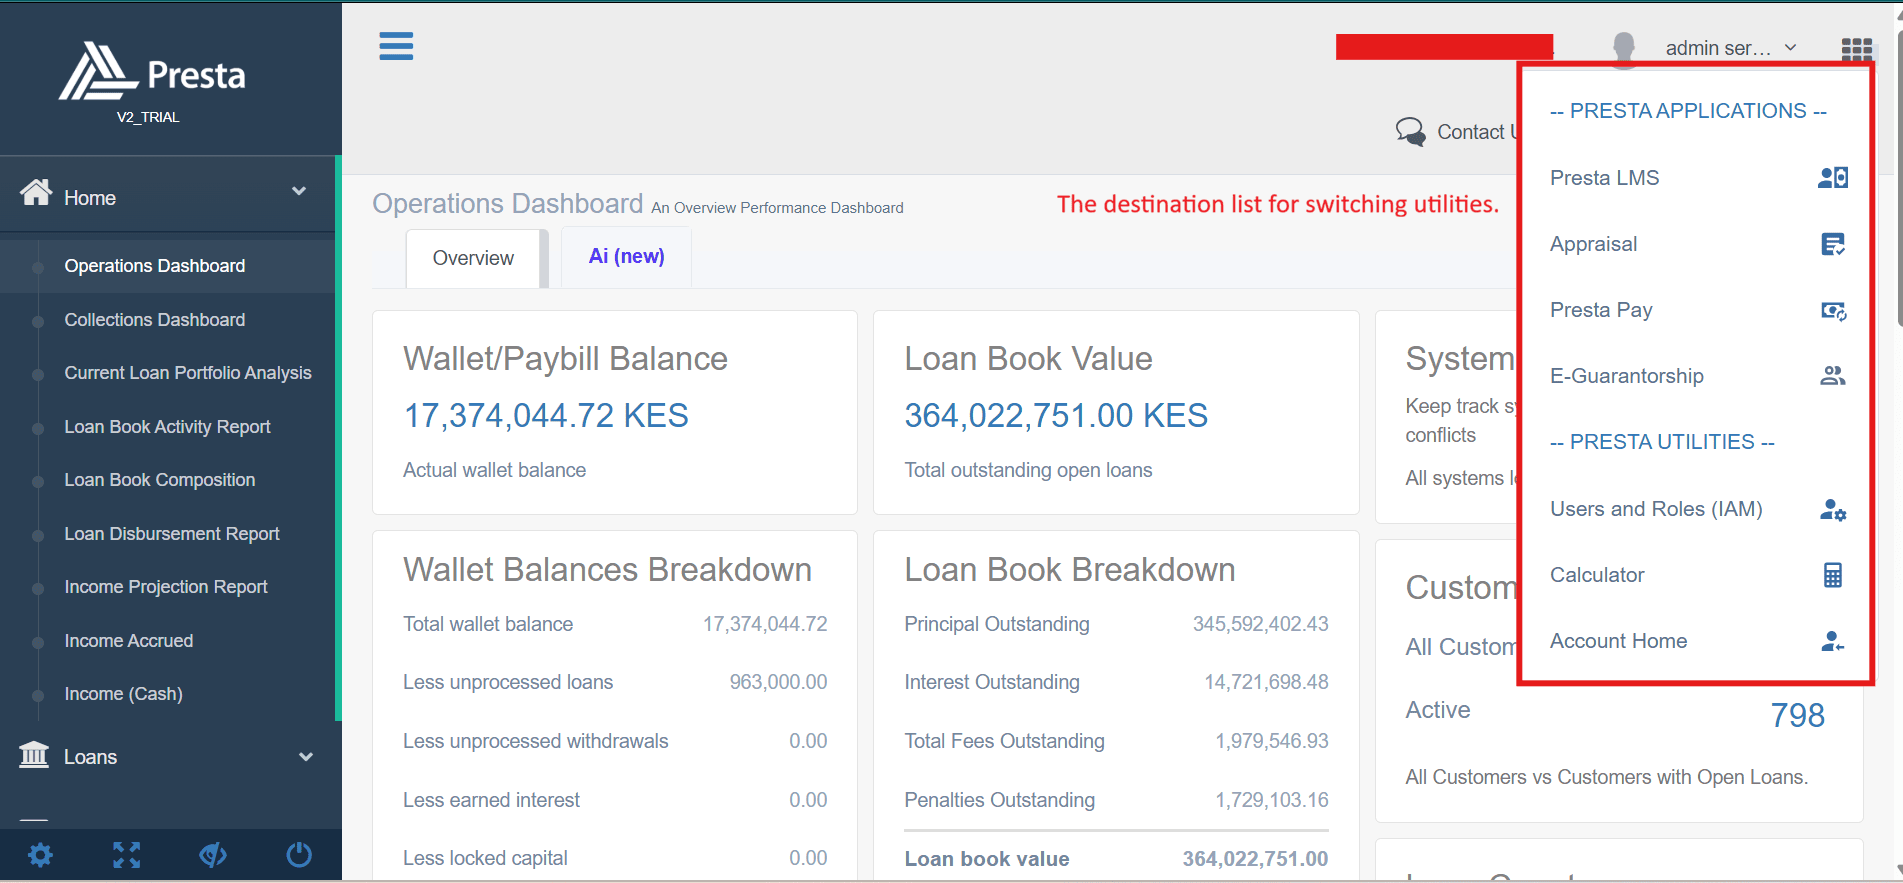
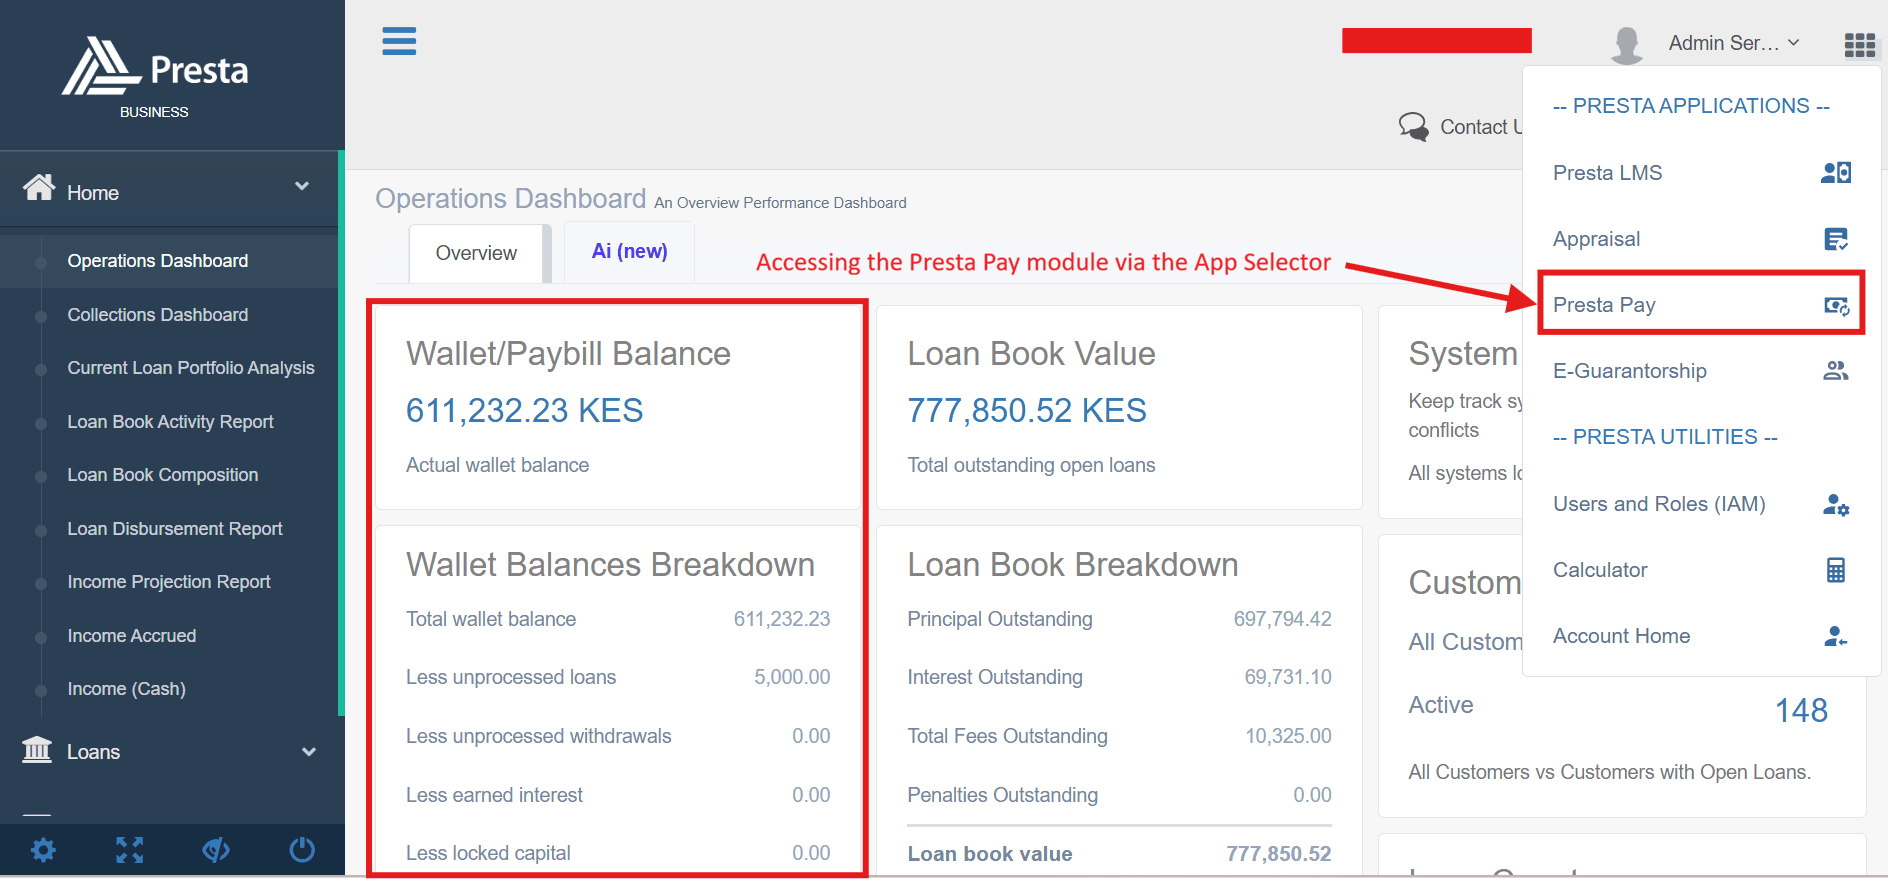
You can switch services seamlessly without logging out. Click the App Launcher (grid icon) in the top right corner of your screen to open the applications menu. From there, you can jump between the LMS, IAM, or other utilities like the Calculator.
How do we create users and roles on Presta?
Staff access is managed through the Identity & Access Management (IAM) module. You can access this directly from the LMS by clicking the App Launcher (grid icon) in the top right corner and selecting Users and Roles (IAM).
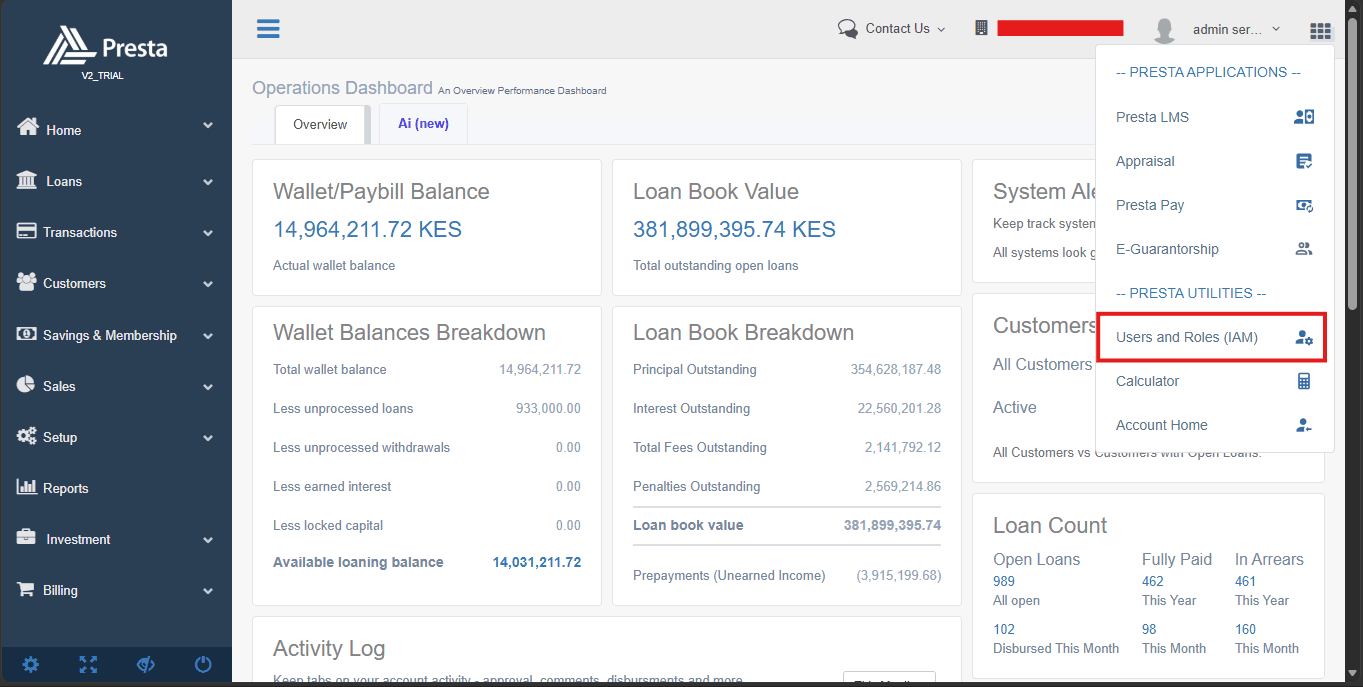
Once inside the IAM Dashboard, you can invite new staff members, track system changes via the Activity Log, and assign specific Roles (such as Admin, Credit Officer, or Accountant). These roles ensure that each team member only has access to the data and functions necessary for their specific job.
How do we configure loan products?
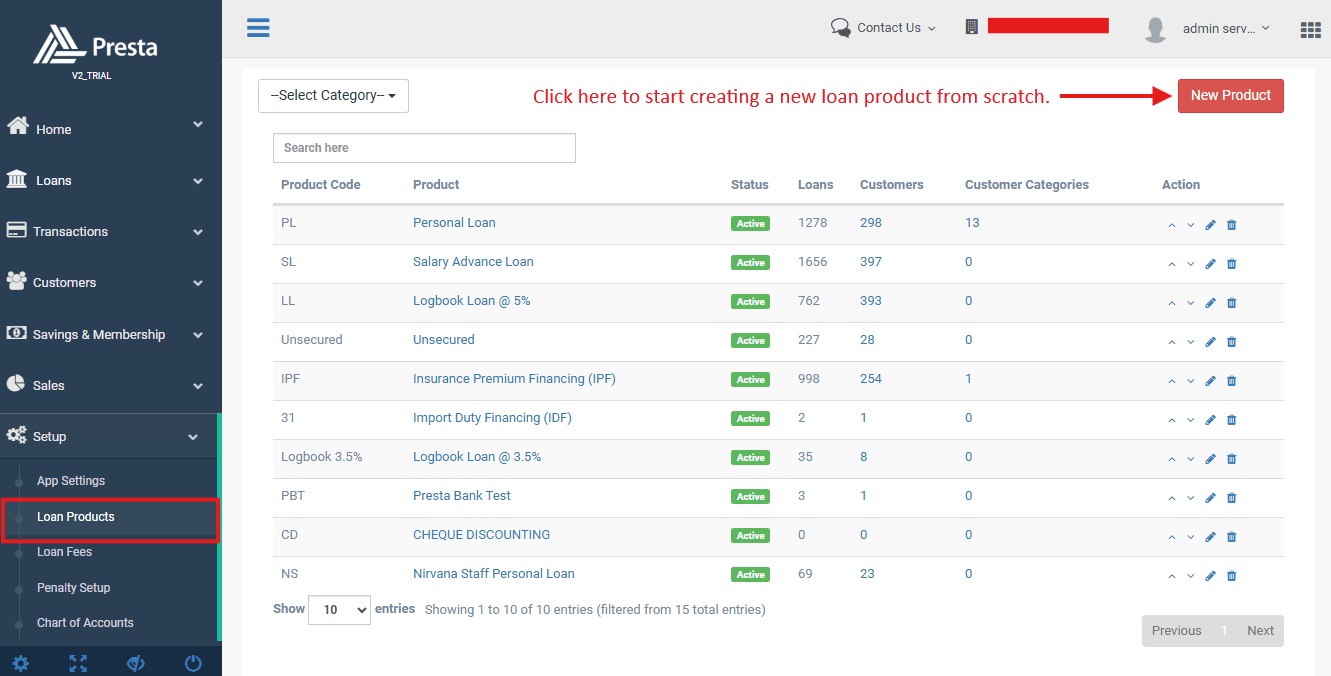
Loan products are configured within the Setup module of the LMS. Here, you can define different product categories (like Personal Loans or Logbook Loans) and set their specific business logic. This includes interest rates, repayment cycles, and loan limits. To start, simply click the "New Product" button.
Can we customize workflows to match our processes?
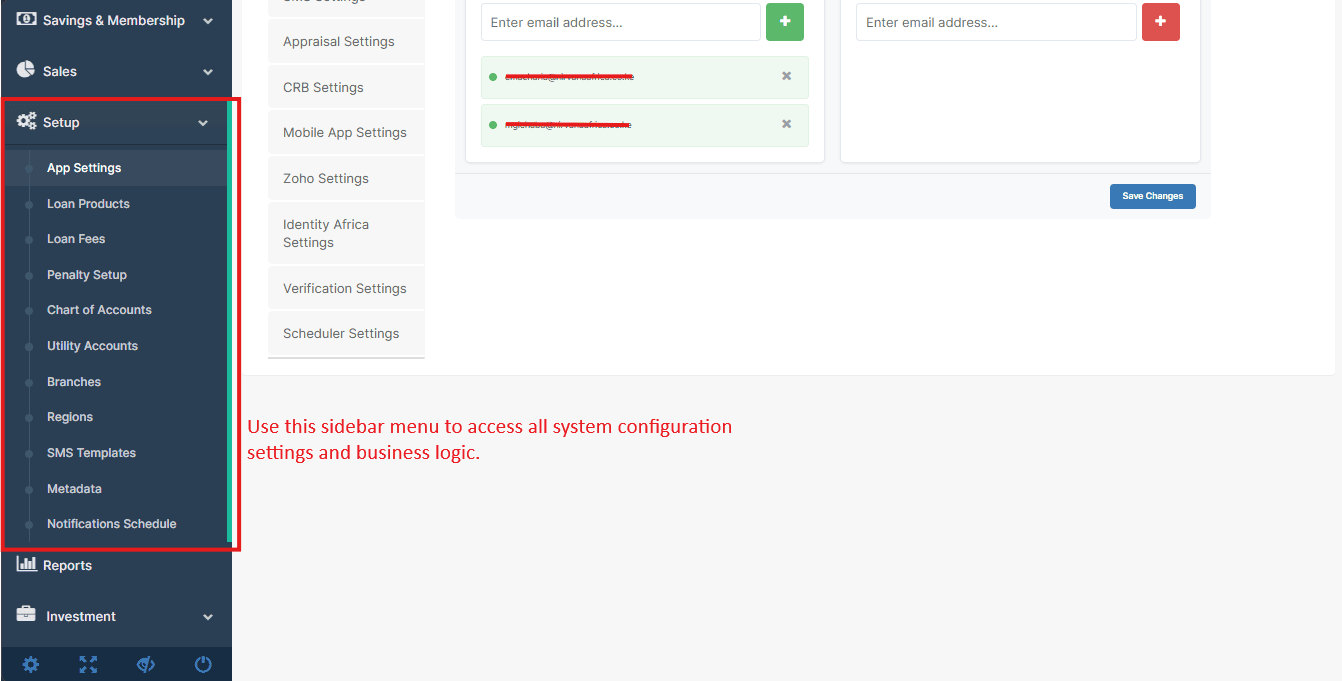
Yes. Through the Setup menu, you can align the system with your operational rules. This includes automating client communication via SMS Templates, defining institutional hierarchy through Branches, and capturing unique data points using Metadata.
3. Loan Application Setup
How do customers apply for loans?
Customers can apply through multiple channels depending on your configuration:
- Mobile App (Android/iOS): Customers download your branded app and apply directly. Loan Source will appear as "WEBSITE" or "LMS-WEB" in the loans listing.
- USSD: Customers using feature phones can apply via a USSD short-code (377155#). This is managed through the Presta USSD module.
- Web: Applications can be submitted through a web-based portal. These appear with the source "Website request" in the loans listing.
- LMS (manual): Staff can create loans directly from within the LMS under Loans > New Loan.
- CRM Integration: Applications can flow in from integrated systems such as Zoho CRM (shown as "ZOHO-CRM" in the loan source column).
Can we restrict who can apply for loans?
Yes. Presta provides a dual-layer restriction system to ensure only qualified individuals can access credit:
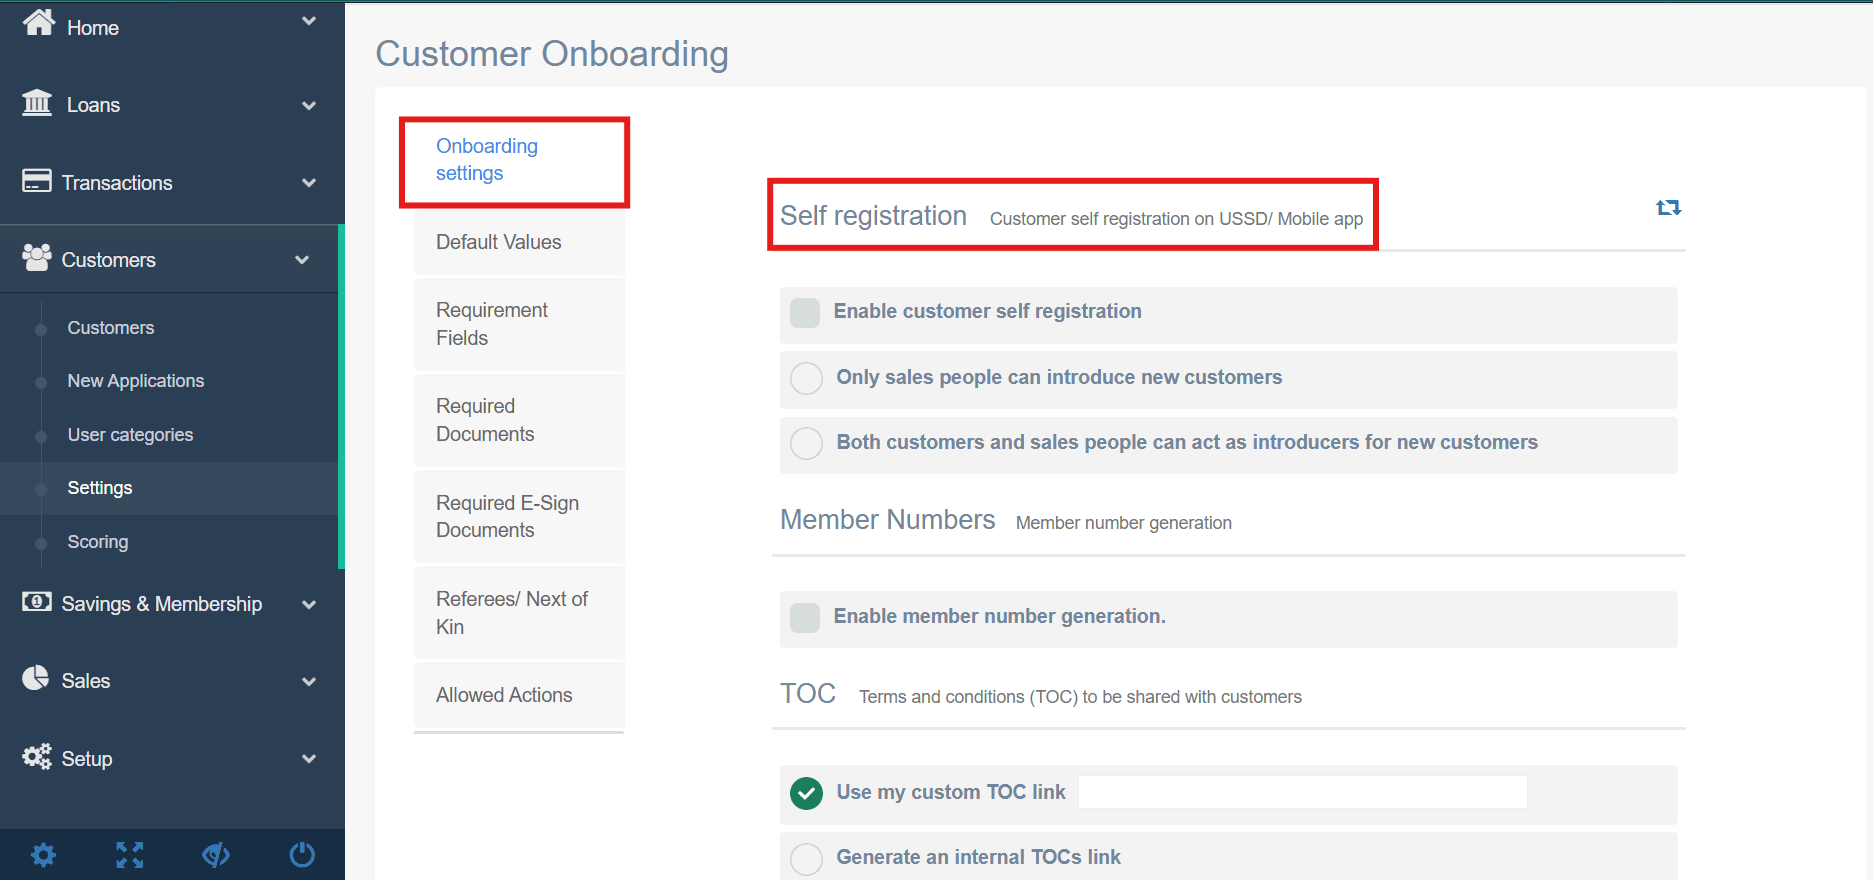
- Onboarding Restrictions (The Entry Gate): Under Customers > Settings > Customer Onboarding, you can control how new users enter the system. You can enable or disable self-registration on USSD/Mobile, or restrict new sign-ups so that only authorized sales agents can introduce new customers.
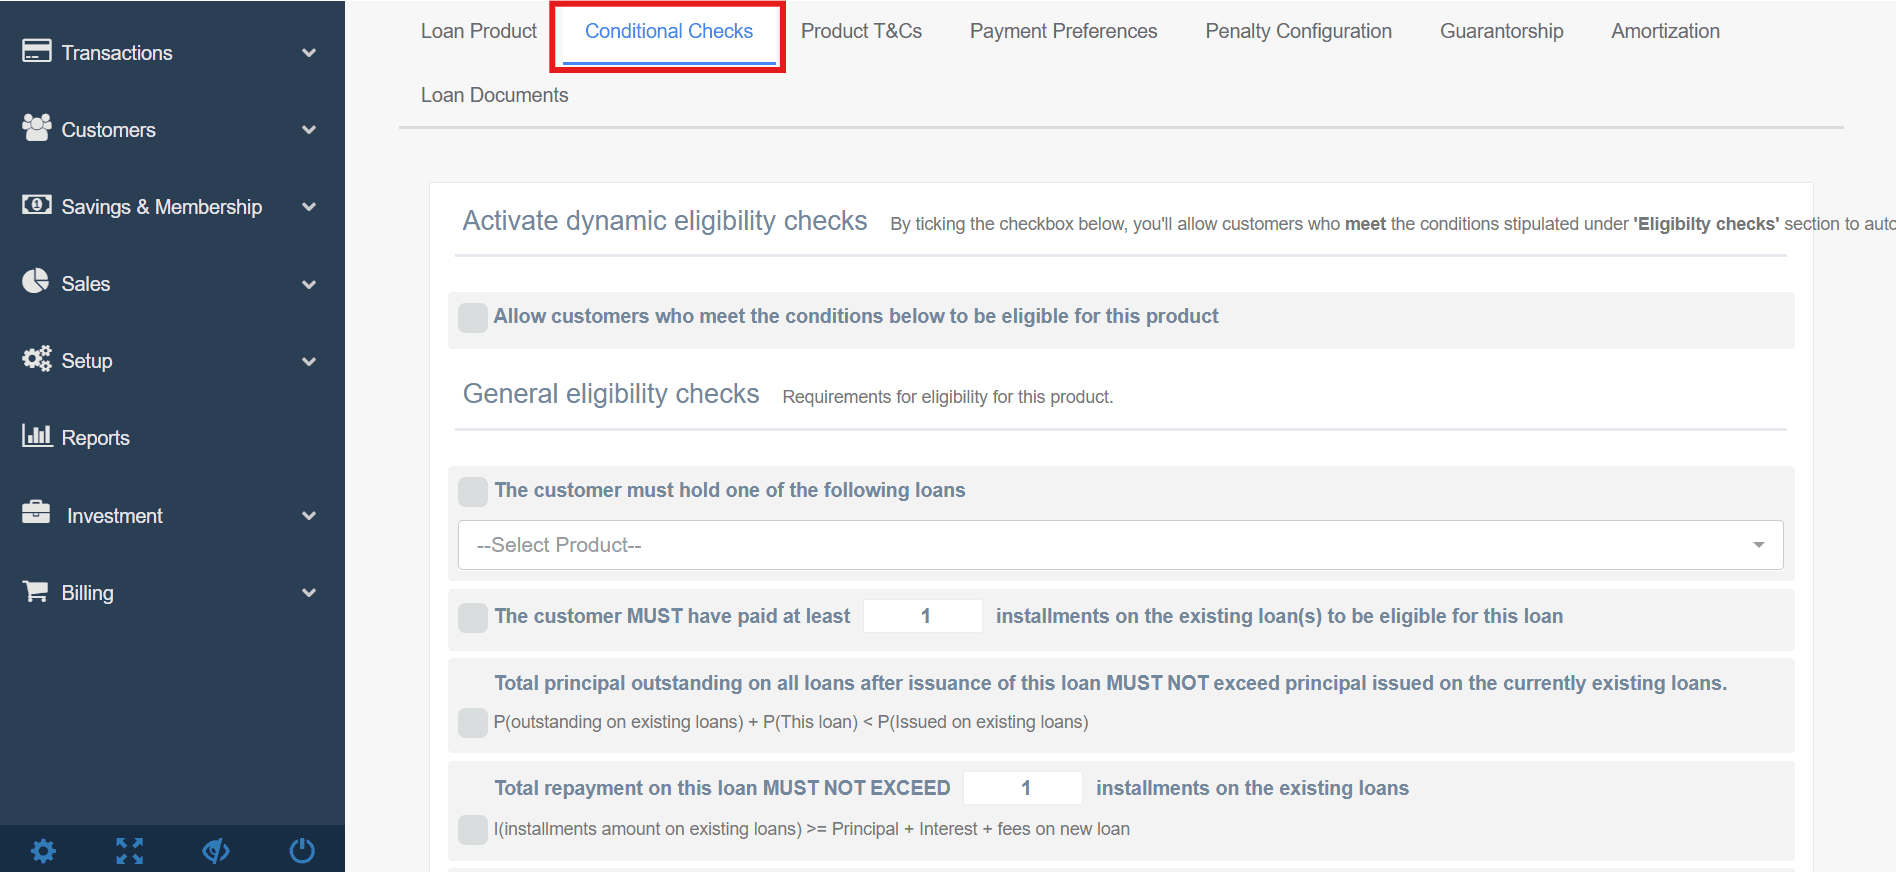
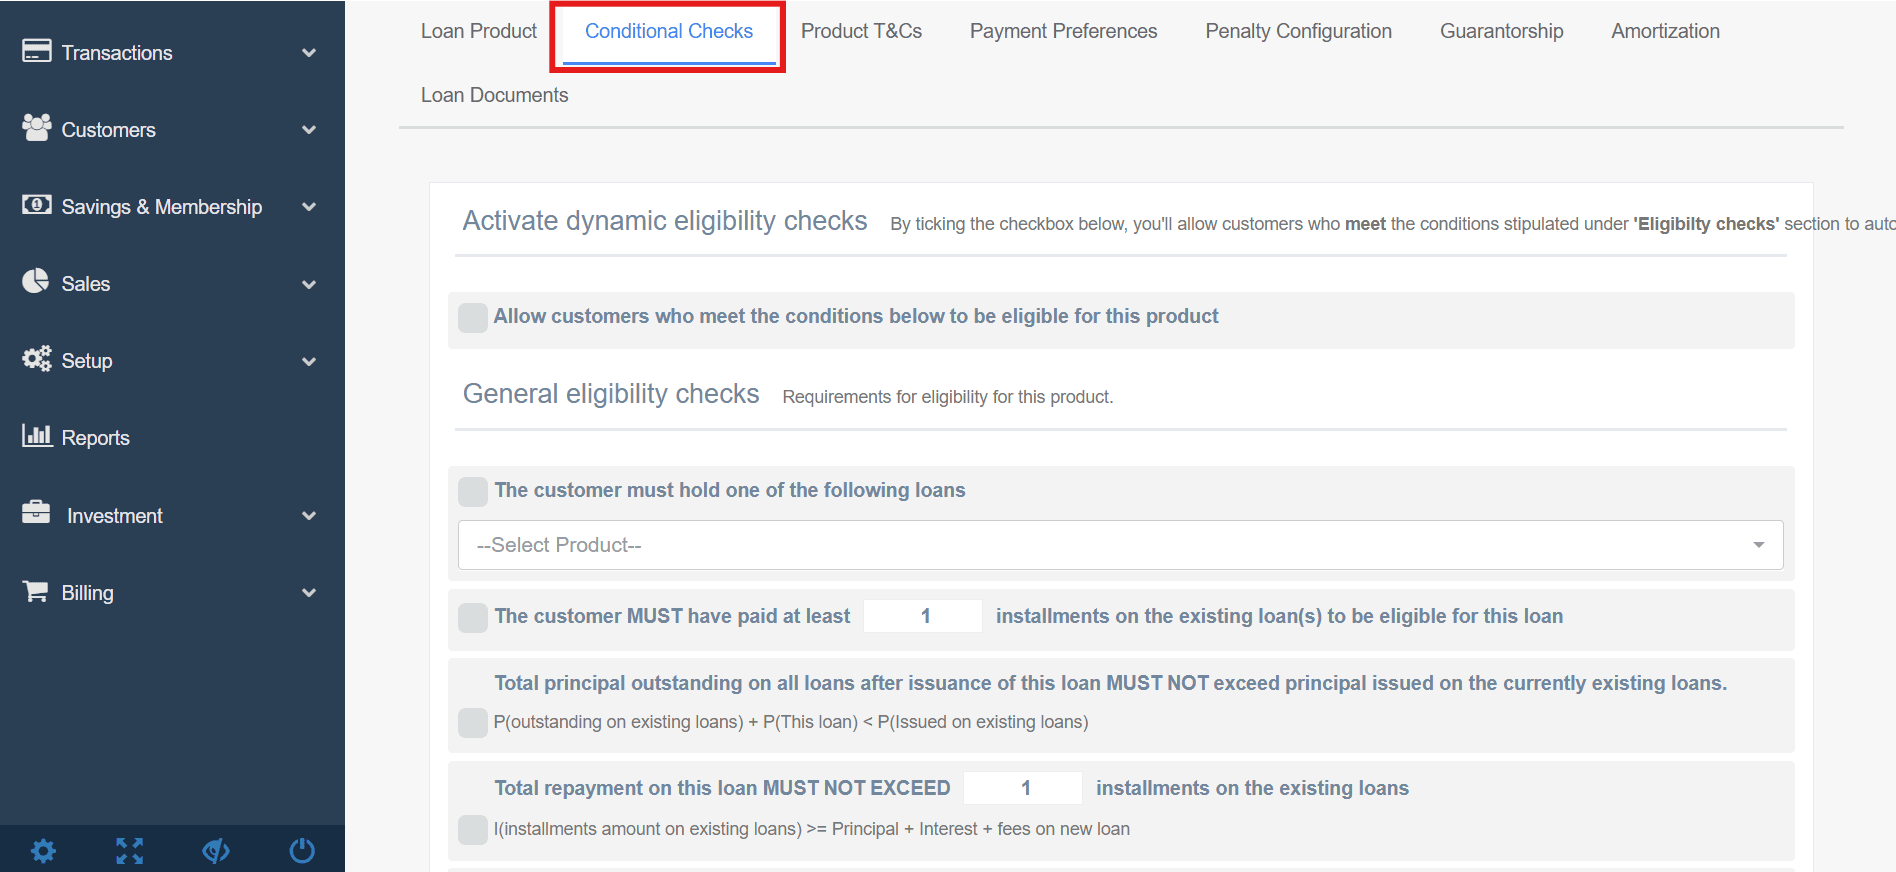
- Product Eligibility (The Product Gate): For users already in the system, you can use the Conditional Checks tab within Setup > Loan Products. This allows you to set specific rules, such as requiring a minimum repayment history or limiting the total outstanding debt a customer can hold before they are allowed to apply for a new product.
- Product Eligibility (The Product Gate): For users already in the system, you can use the User Categories field within Setup > Loan Products. This allows you to Limit a loan Product to a particular user Category.
How do we configure required documents or fields?
Requirement settings are managed at two levels to ensure compliance throughout the customer journey:
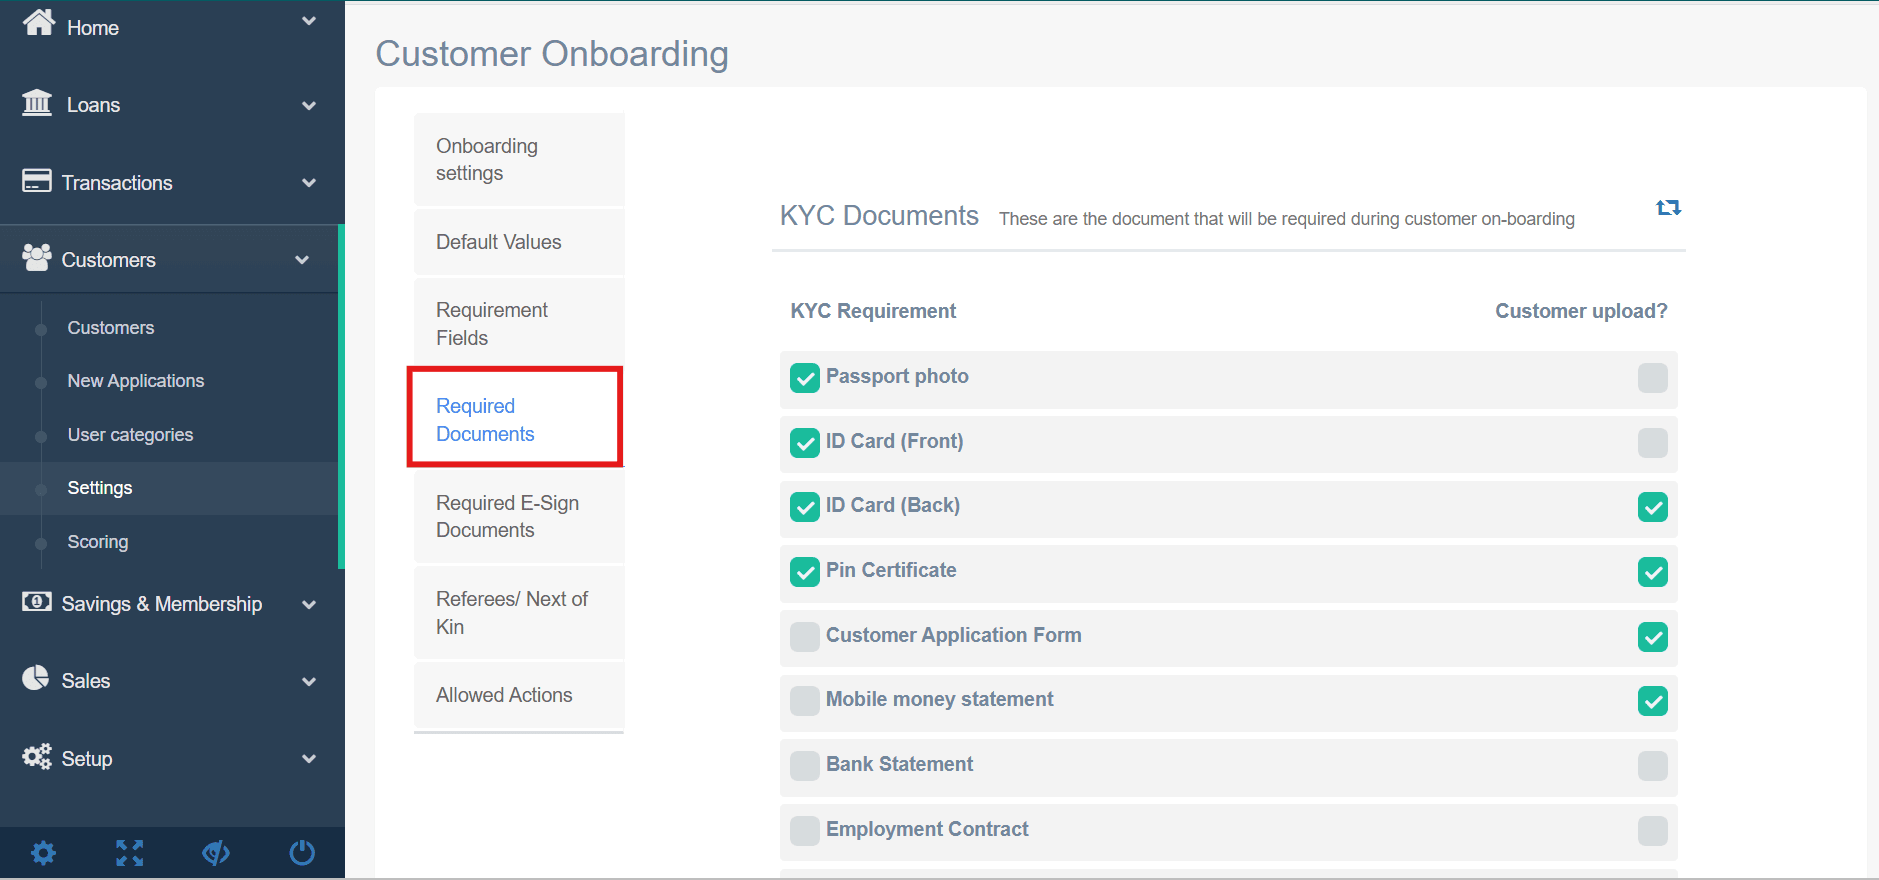
- Platform Level (Onboarding): To set mandatory documents for every customer who joins (e.g., National ID or Signature), navigate to Customers > Settings > Required Documents. This ensures your basic KYC is met before they even apply for a loan.
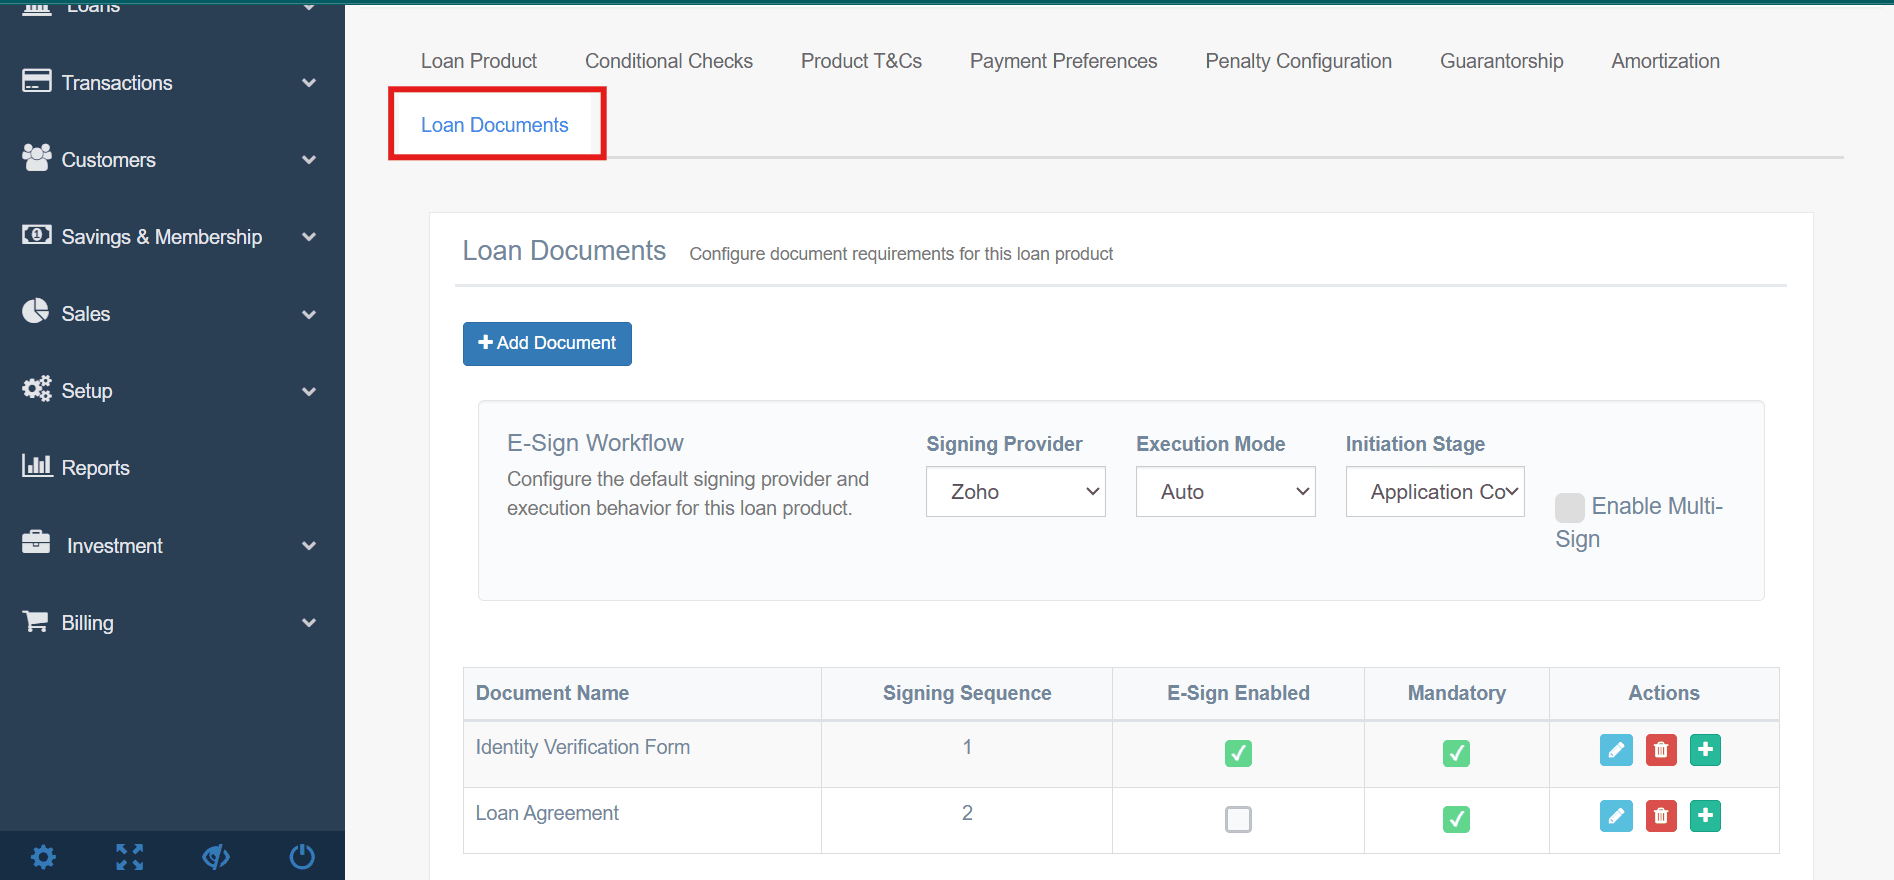
- Product Level (Application): For documents specific to a certain loan type (e.g., a Logbook for a car loan or a Payslip for a salary advance), use the Loan Documents tab within the Setup > Loan Products menu.
Can we enable/disable multiple loan applications?
Yes. The system provides two methods for controlling loan applications to ensure institutional flexibility and risk management:
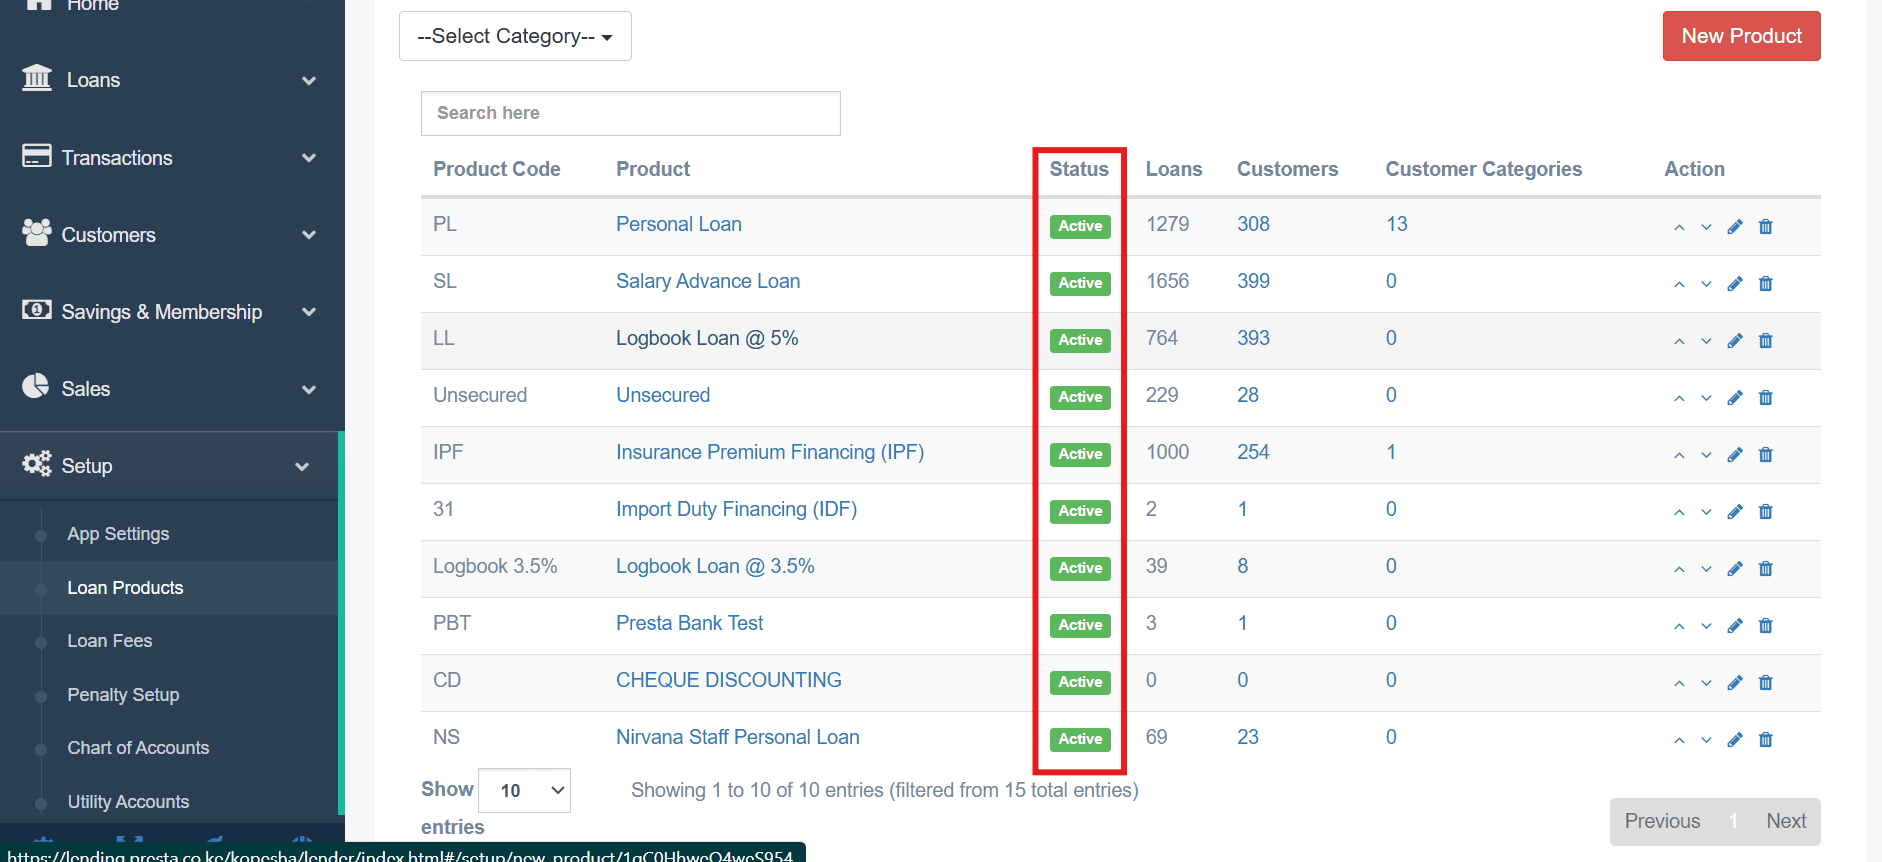
- Product-Level Availability: Within Setup > Loan Products, each product has an Active/Inactive status. Setting a product to "Inactive" immediately disables it across all channels (Mobile, USSD, and Web), preventing any new applications from being submitted.
- Eligibility-Level Restrictions: For products that are active, you can restrict concurrent loans using the Conditional Checks tab. This allows you to block a customer from applying for a second loan if they have not met specific criteria, such as paying off a set number of installments on their current balance.
How do we enable and configure top ups?
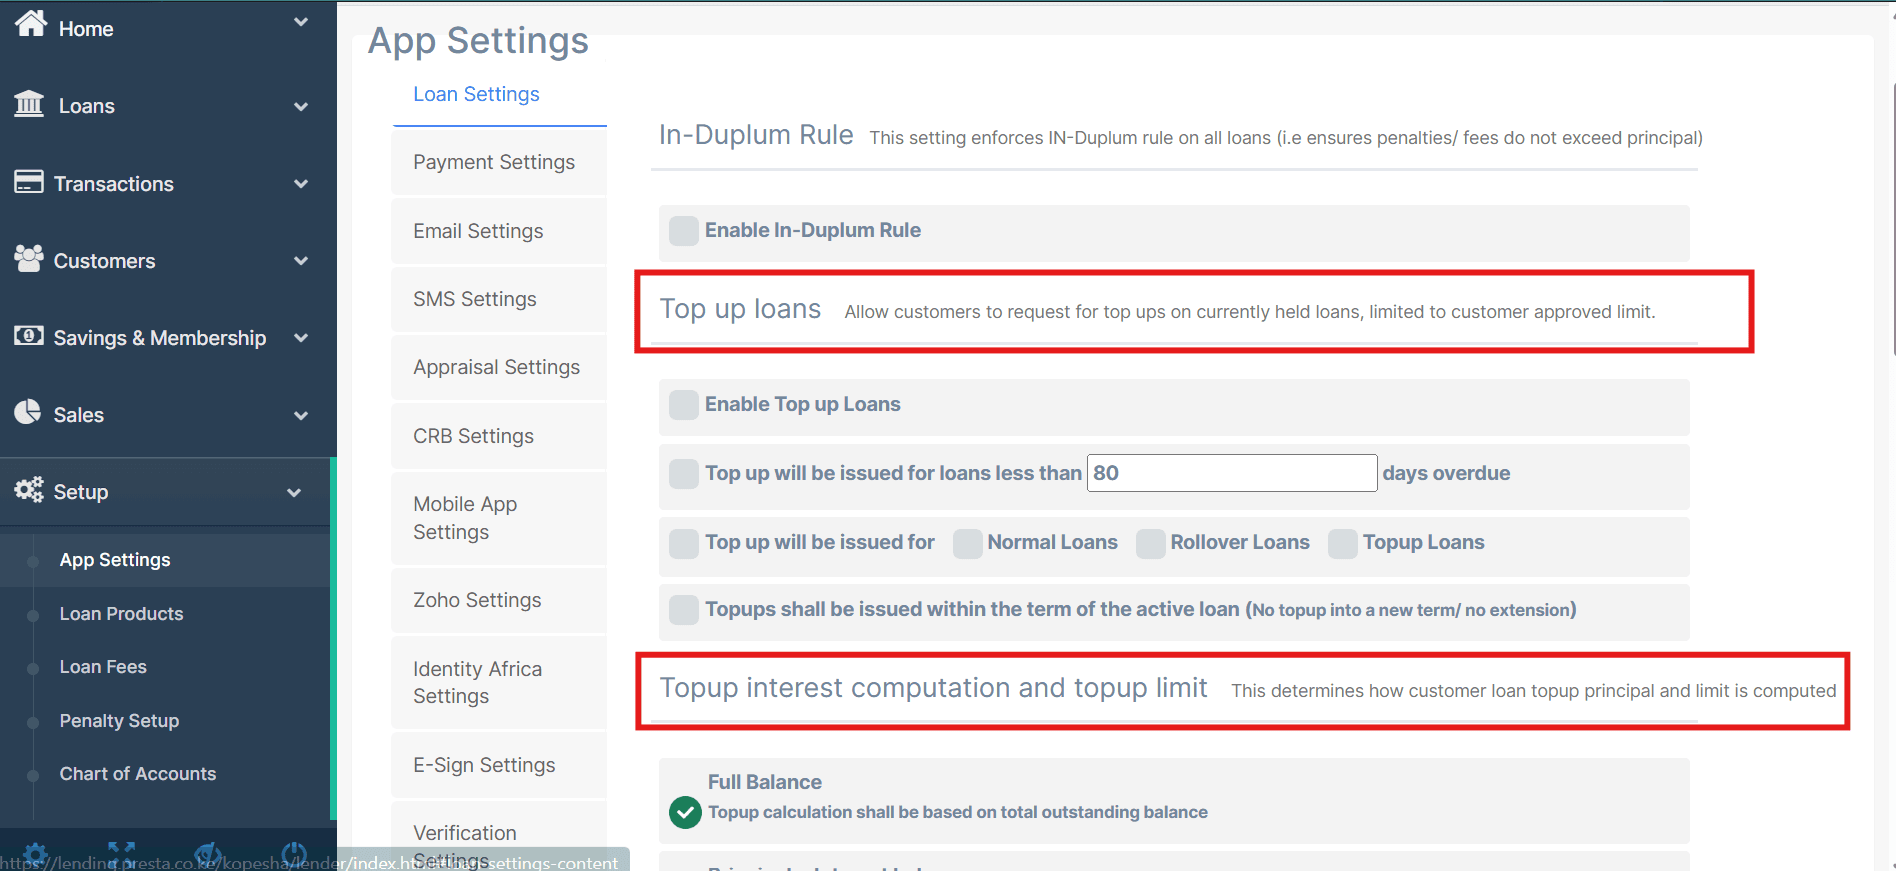
Top-up functionality is managed globally under Setup > App Settings > Loan Settings. This section defines the core rules for how customers can refinance their active loans.
Available configurations include:
- Enable Top-up Loans: A master toggle that allows customers to request additional funds on active loans.
- Days Overdue Threshold: Defines the cut-off point (e.g., 80 days) where a loan becomes too delinquent to qualify for a top-up.
- Eligible Loan Types: Specifies if top-ups apply to Normal, Rollover, or existing Top-up loans.
- Term Restrictions: Determines if the top-up must be issued within the current loan's remaining term or if it can extend the duration.
- Interest Computation: Sets whether the top-up limit is calculated based on the total outstanding balance or other specific principal metrics.
4. Loan Approval Workflow
What is the Presta Appraisal module and how does it assist in automated approvals?
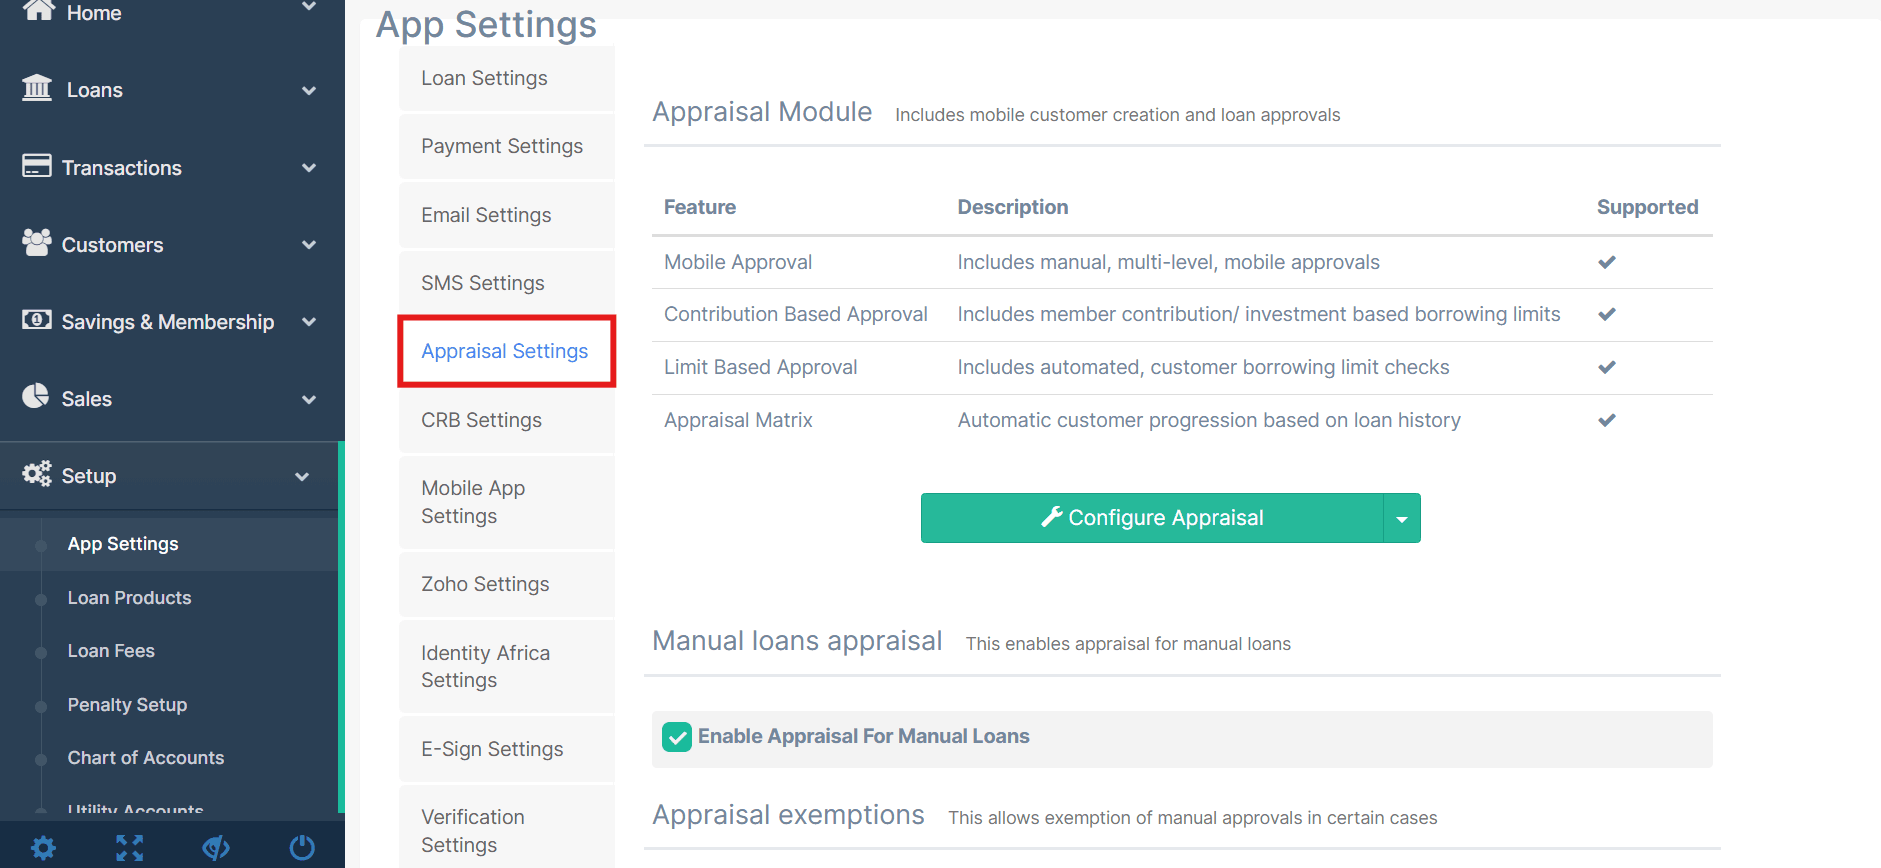
The Presta Appraisal Module is a dedicated approval engine that bridges the gap between a customer's application and the final disbursement. It is configured under Setup > App Settings > Appraisal Settings. This module transforms manual credit policies into automated system rules, supporting several advanced approval frameworks:
- Mobile & Multi-Level Approvals: Allows for manual reviews that can be performed via mobile devices. It supports hierarchical workflows where a loan must pass through multiple staff levels before finalization.
- Contribution-Based Approval: Specifically designed for SACCOs and investment groups, this feature automatically enforces borrowing limits based on a member's shares or contributions.
- Limit-Based Approval: Automates checks against a customer's pre-approved credit limit. If a requested loan falls within the assigned limit, the system can process the approval instantly.
- Appraisal Matrix: An automated progression tool that rewards positive repayment behavior. As customers repay loans successfully, the matrix can automatically increase their credit limits or expedite their future approval paths.
How do we configure approval workflows?
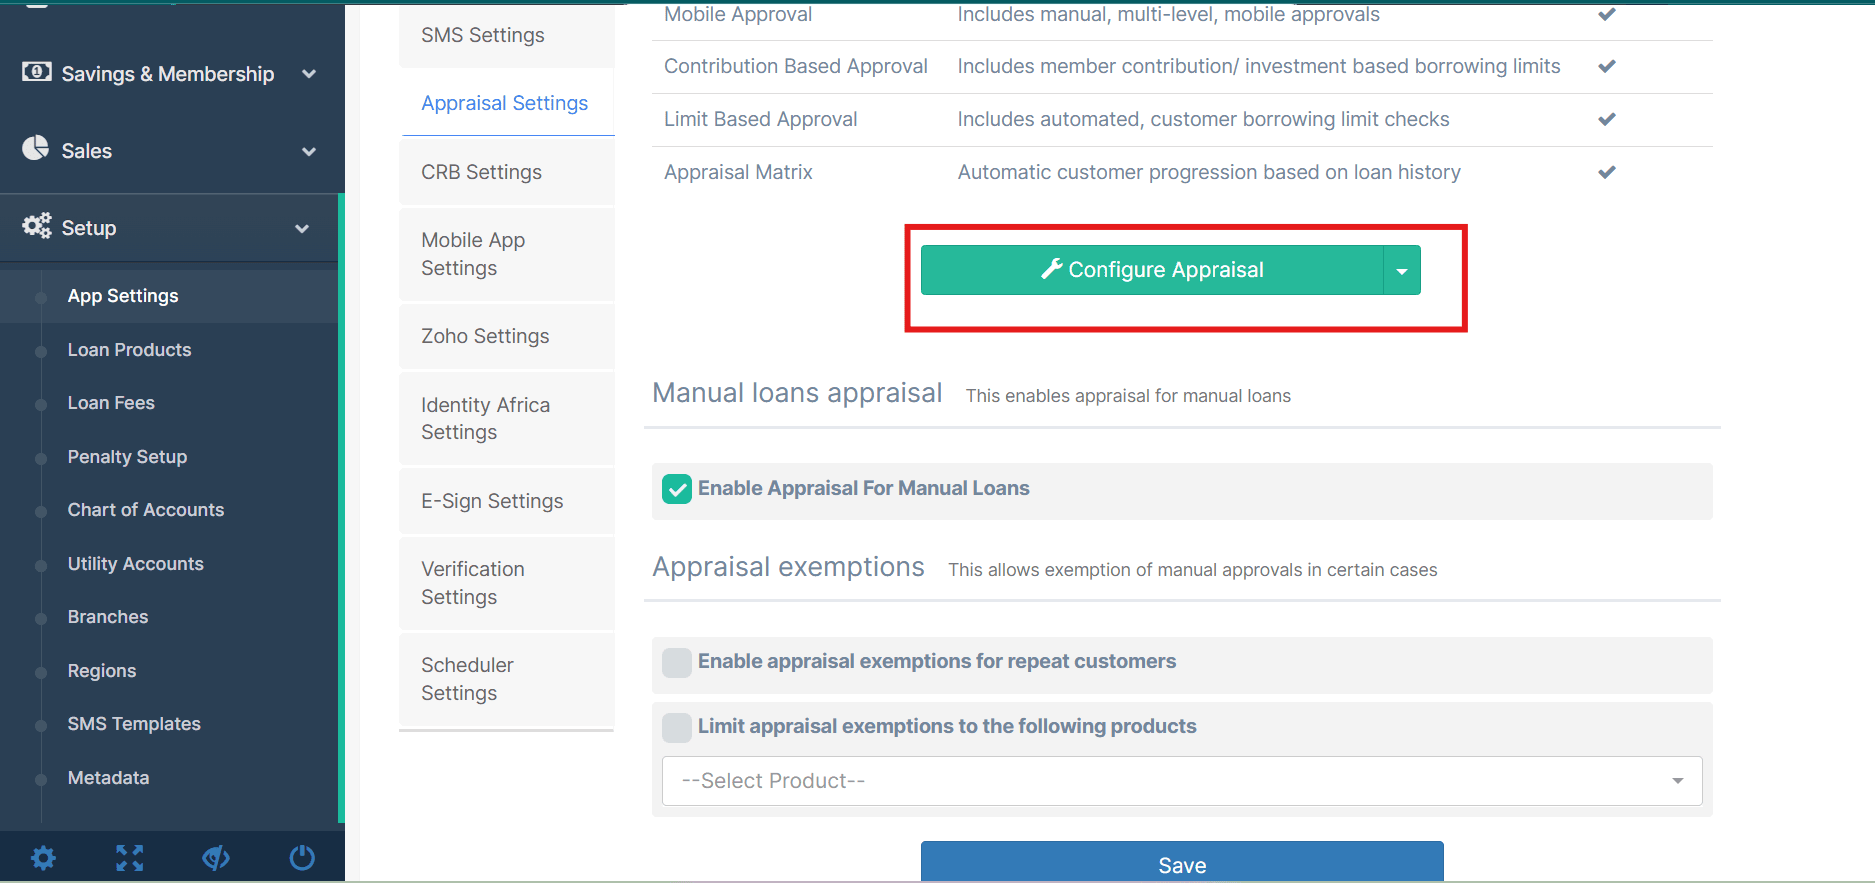
Approval workflows are configured through the Appraisal Settings under Setup > App Settings. You can enable manual appraisal for loans that require human review, set up automated limit-based approvals for qualifying applications, and define appraisal exemptions for cases where manual approval should be bypassed. Each loan product can also have its own Conditional Checks tab to define product-specific eligibility criteria.
Can we have multiple approval levels?
Yes. The system supports a hierarchical structure. By enabling Mobile Approval, you allow multiple authorized users (e.g., a Credit Officer followed by a Manager) to review and action loans directly from their devices. This ensures that high-value or high-risk loans are never disbursed without a second pair of eyes.
Can approvals be automated?
Yes. Automation is achieved through three primary features:
- Limit-Based Approval: Automatically approves loans that fall within a customer's pre-set credit limit.
- Appraisal Matrix: Uses loan repayment history to automatically progress a customer's status.
- Appraisal Exemptions: As seen in Figure 4.3, you can enable exemptions for repeat customers or specific products, allowing these applications to bypass the manual appraisal queue entirely.
Can a loan be edited after submission?
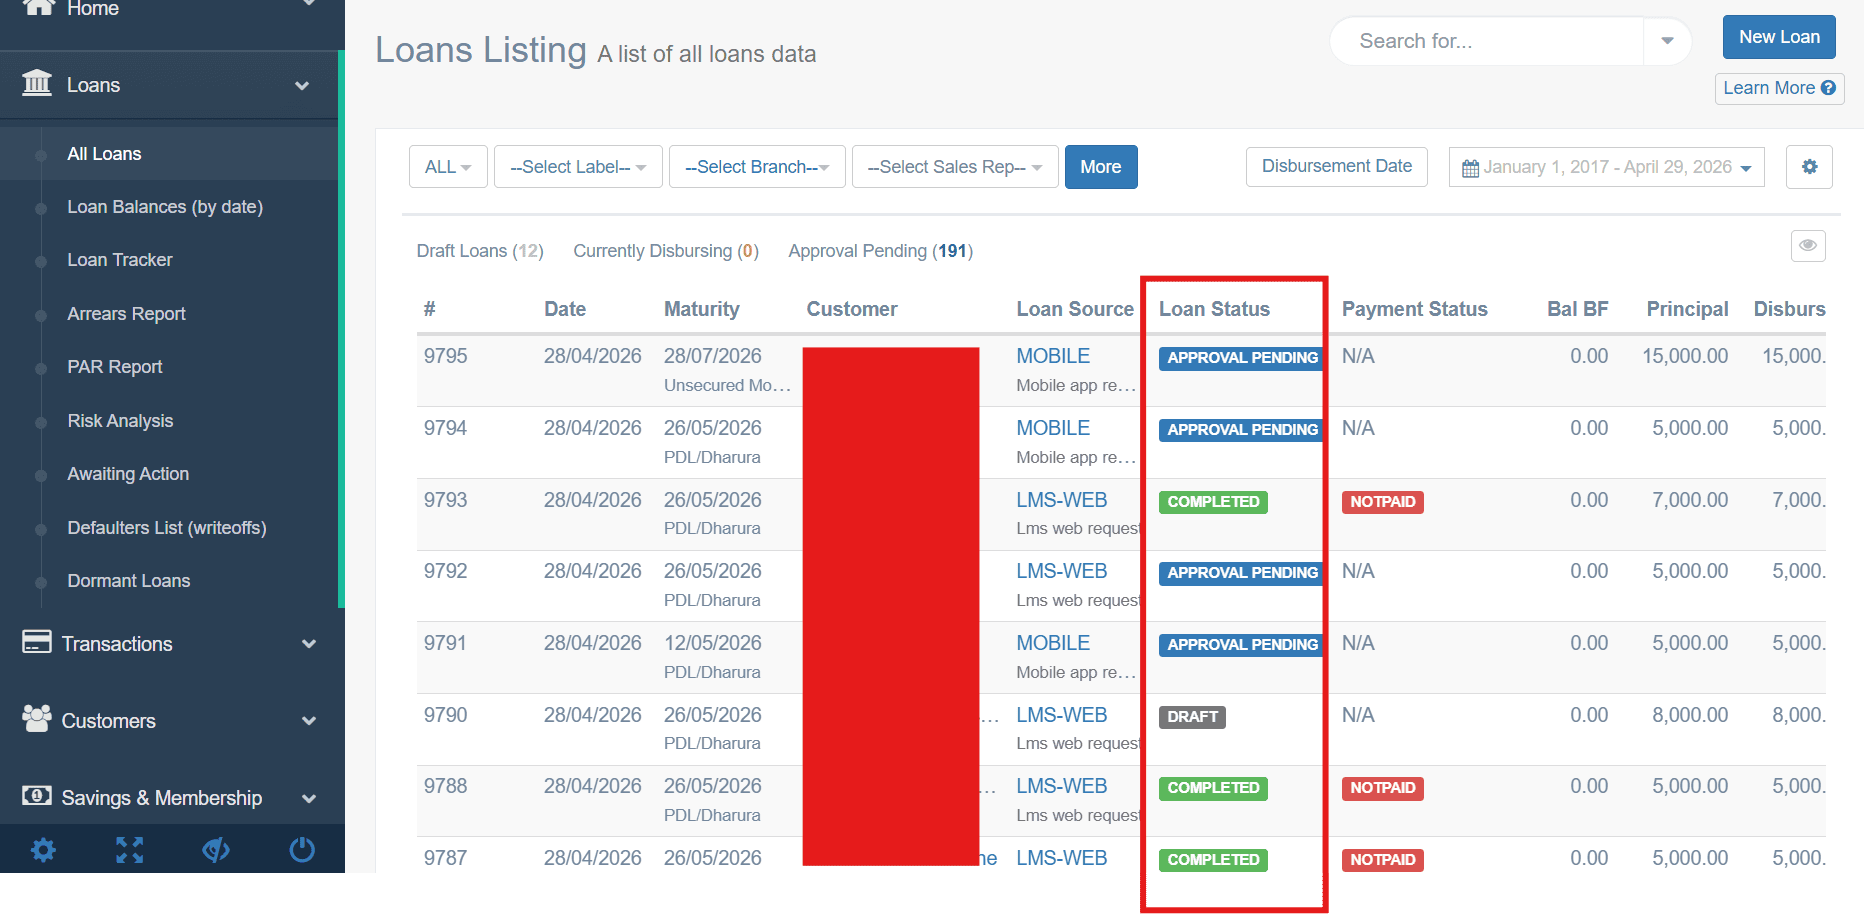
Editing a loan depends entirely on its status in the Loans Listing. To maintain a clean audit trail, the system restricts changes once an application officially enters the workflow.
- Draft Status (Editable): As long as a loan is marked as a Draft, you have full control. You can open it, change the amount, period, or any other field, and save it. It hasn't been "submitted" to the credit team yet, so it's still your workspace.
- Approval Pending (Locked Form, Adjustable Terms): Once the loan is submitted, the original application form is locked — you can't go back and change what the customer originally typed. However, during the Appraisal phase, an officer can modify the proposed terms (like lowering the approved amount) before final approval.
- Completed / Disbursing (Permanent): Once the loan is finalized or money has been sent, it is legally binding. No further edits are possible. If an error is found at this stage, the loan must be cancelled or restructured.
How do we handle rejected applications?
When a loan is rejected during the approval process, it is flagged accordingly in the system. Credit officers can review the reason for rejection and either make corrections for resubmission or communicate the outcome to the customer. The Awaiting Action queue under Loans helps staff identify applications that require follow-up.
5. Disbursement Integration
What is the role of Presta Pay?
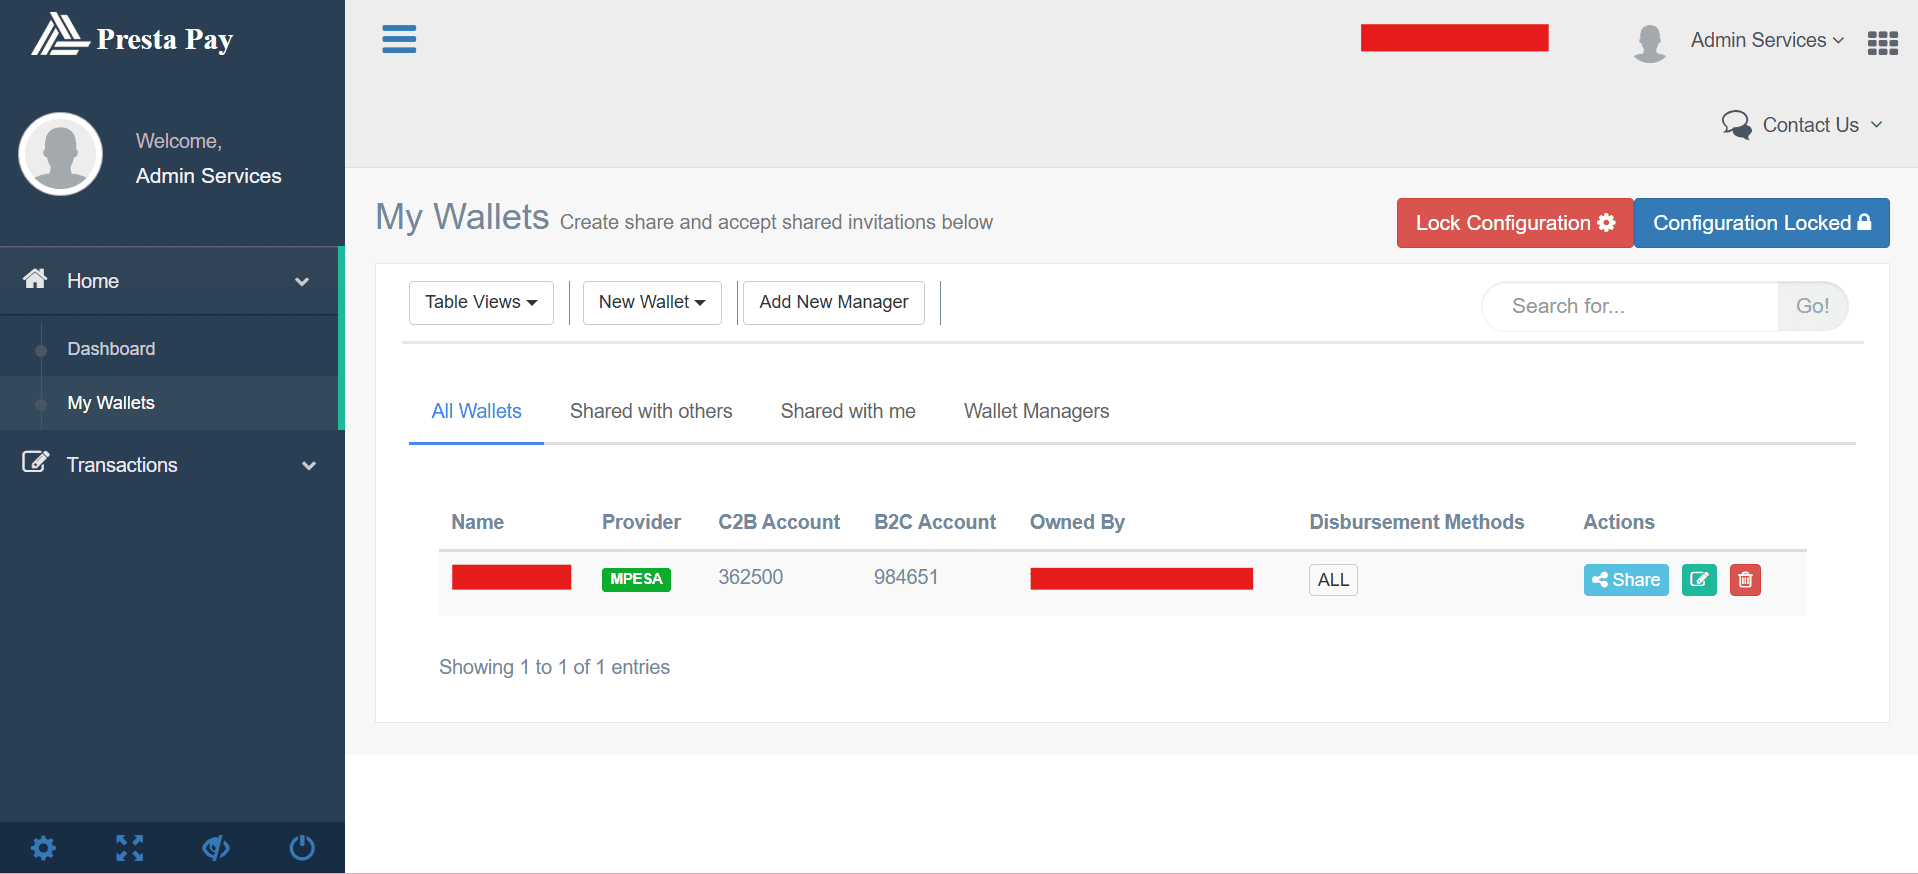
Presta Pay is your payment engine. Think of it as the bridge between your system and the money. It manages your Wallet/Paybill Balance — the actual pool of funds used for loans. You can track your real-time balance, unprocessed loans, and locked capital on the Operations Dashboard. Always check that your wallet is funded before hitting "Disburse."
Does Presta disburse loans?
Yes. Presta handles disbursements directly through the integrated Presta Pay wallet. Once a loan is approved, the system can trigger disbursement to the customer via mobile money (e.g. M-Pesa) or bank transfer, depending on your configured disbursement channels.
How do we integrate with mobile money/banks for disbursement?
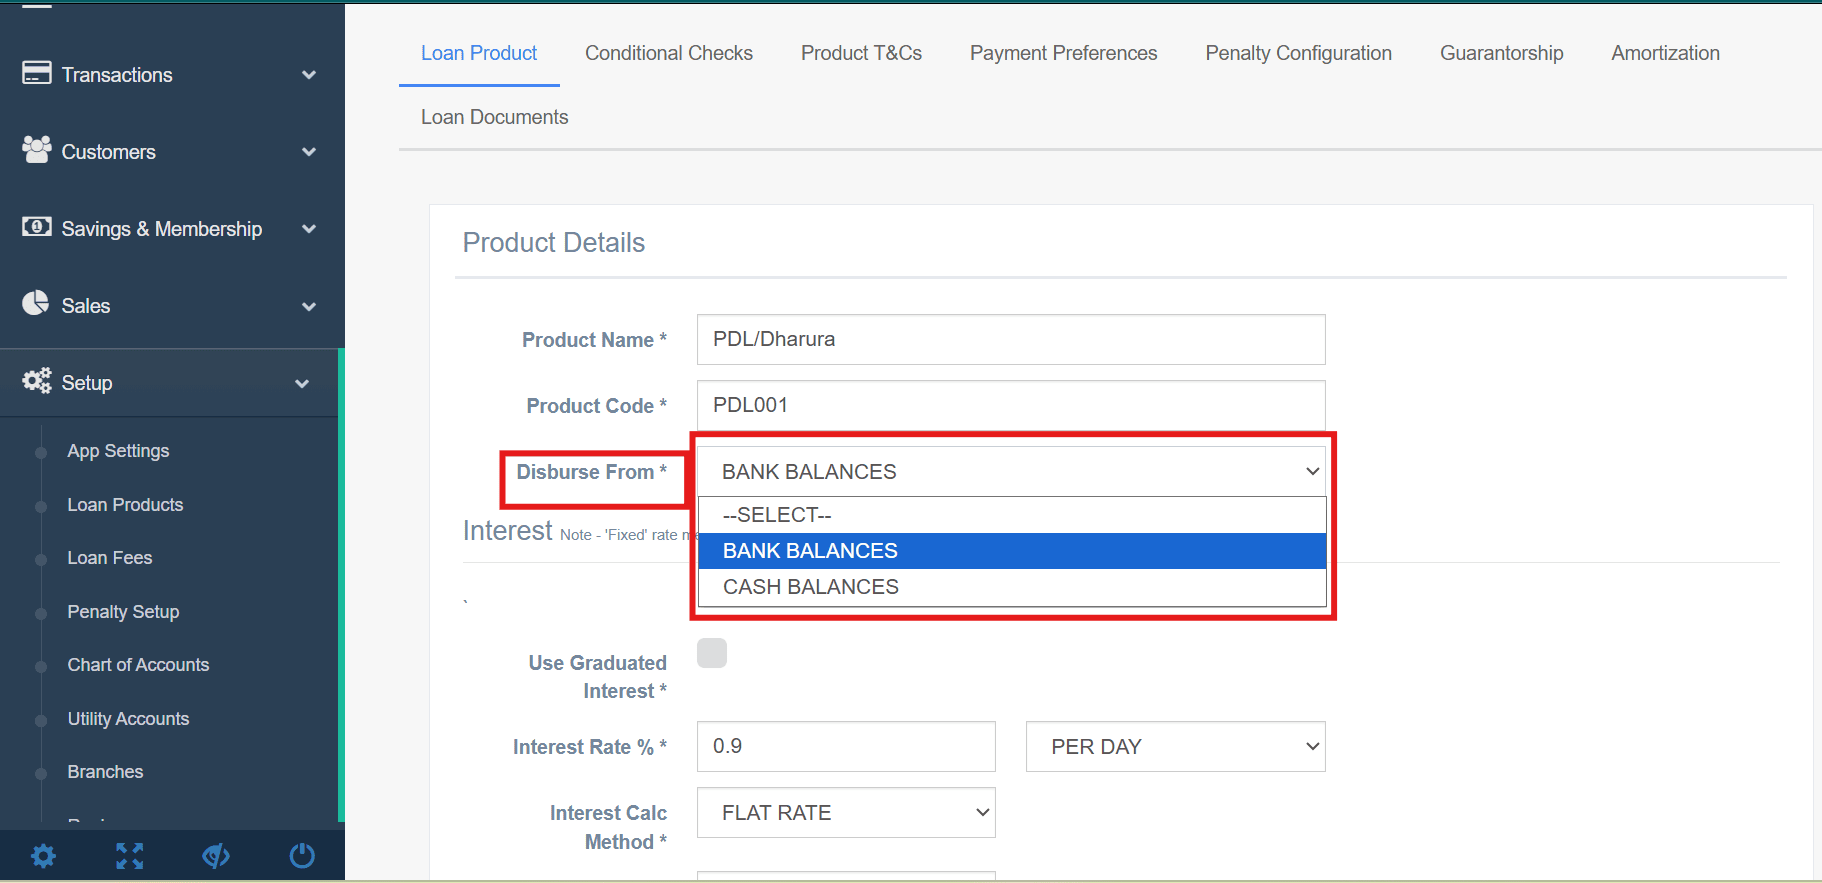
You set this up at the product level. When you're in Loan Products, the "Disburse From" field lets you pick your source (like M-Pesa B2C). While the technical "handshake" with the bank or Safaricom is handled during onboarding, you choose which product uses which channel.
How is disbursement triggered in the system?
It depends on your settings:
- Manual: An authorized staff member clicks the final button.
- Automatic: The system sends the funds the moment approval is complete. You can watch the progress in the Loans Listing under the "Currently Disbursing" tab.
How do we handle failed disbursements?
Failed disbursements appear in the system with an error status. Staff should check the Transactions section and the System Alerts panel on the Operations Dashboard, which flags validation issues and data conflicts. Common causes include insufficient wallet balance, incorrect phone numbers, or mobile money downtime. Once the issue is resolved, the disbursement can be retried.
How does Presta Sign facilitate paperless loan guarantorship?
Presta Sign is a digital signature module that allows guarantors to review and sign loan guarantee documents remotely via their mobile phone, without the need for physical paperwork. Once a loan requiring a guarantor is created, the system sends a signing request to the guarantor. Their signed response is captured and stored in the system, creating a fully digital audit trail.
6. Reporting & Accounting
What reports are available in the system?
Presta keeps a massive library of reports categorized by the specific needs of your team. You can find these in the Reports menu on the left.
- For the Accountant: Full financial statements including Balance Sheets, P&L, and Cash-flow. You also get Trial Balances, Overpayment reports, and Income Projections (Accrued vs. Cash).
- For the Credit Manager: Comprehensive loan book analysis. Use the Loan Listing, Disbursement Reports, and the Loan Tracker to monitor daily or monthly movement.
- For Risk & Collections: Dedicated Arrears Reports, PAR (Portfolio at Risk), and Risk Analysis based on SASRA guidelines. You can also track Defaulters and Dormant Customers.
- For Sales & Operations: Real-time Collections Dashboards and Sales Agent KPIs to see who is bringing in money and who is lagging.
- For Regulatory Compliance (SASRA): Ready-made returns for Capital Adequacy, Daily Liquidity, and Sectoral Lending, saving you the trouble of manual compilation.
- For IT & Audit: Track system health through SMS/Email logs, Integration reports, and Audit Trails.
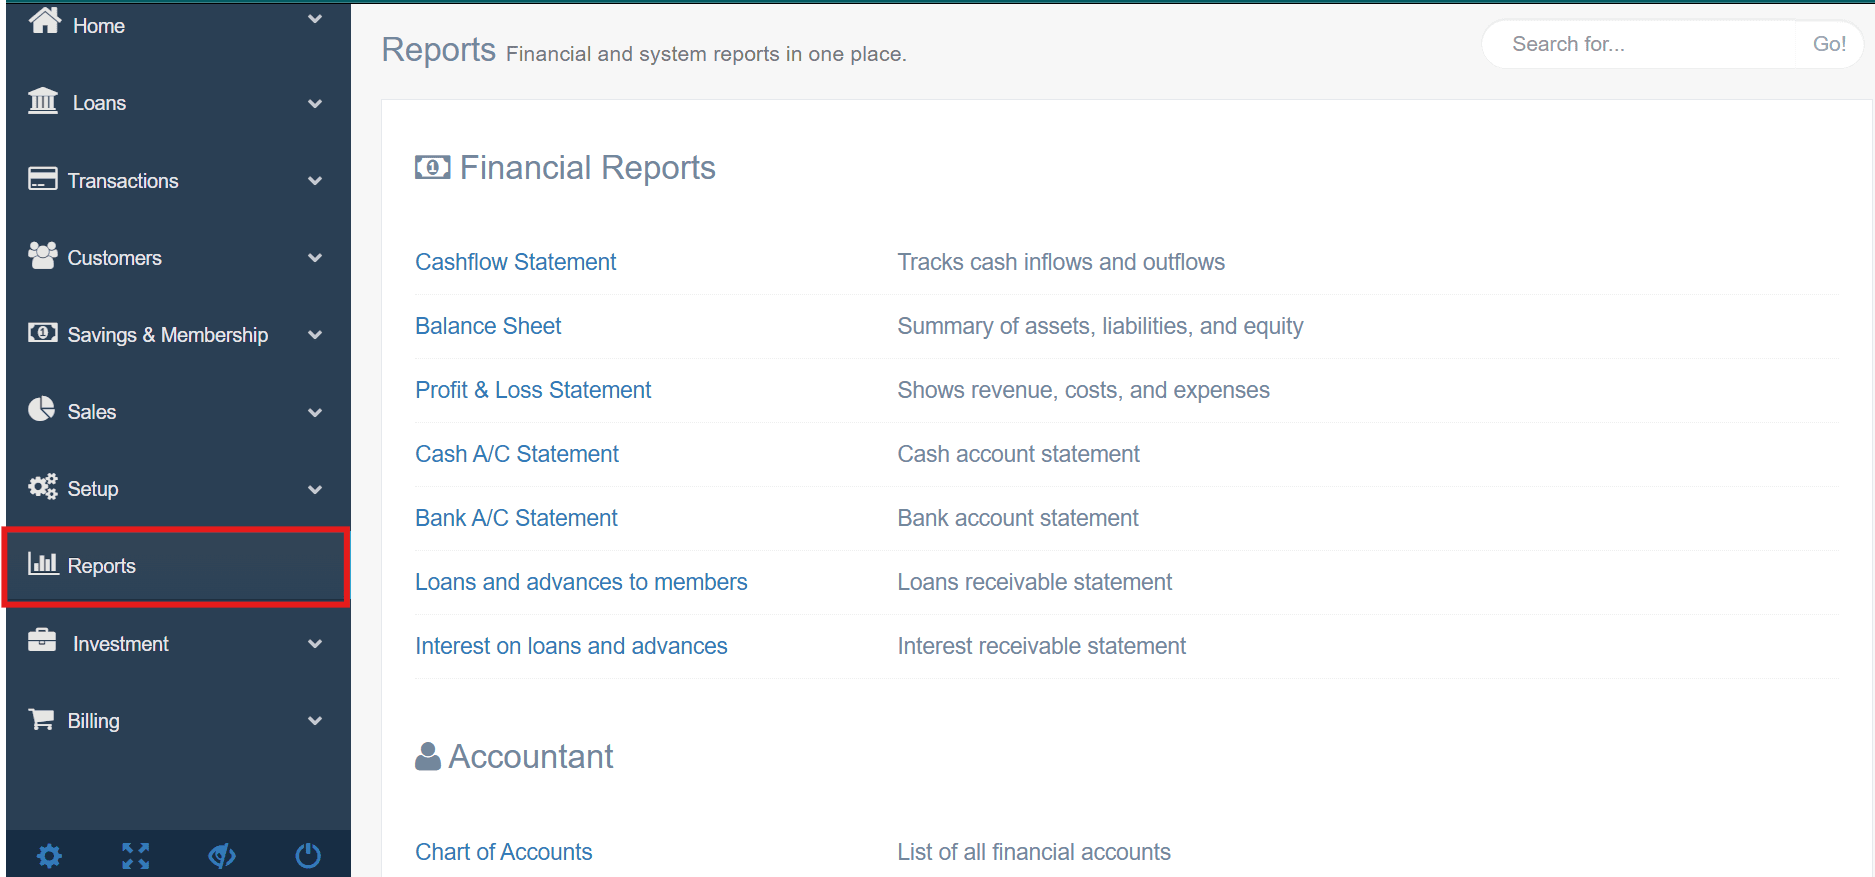
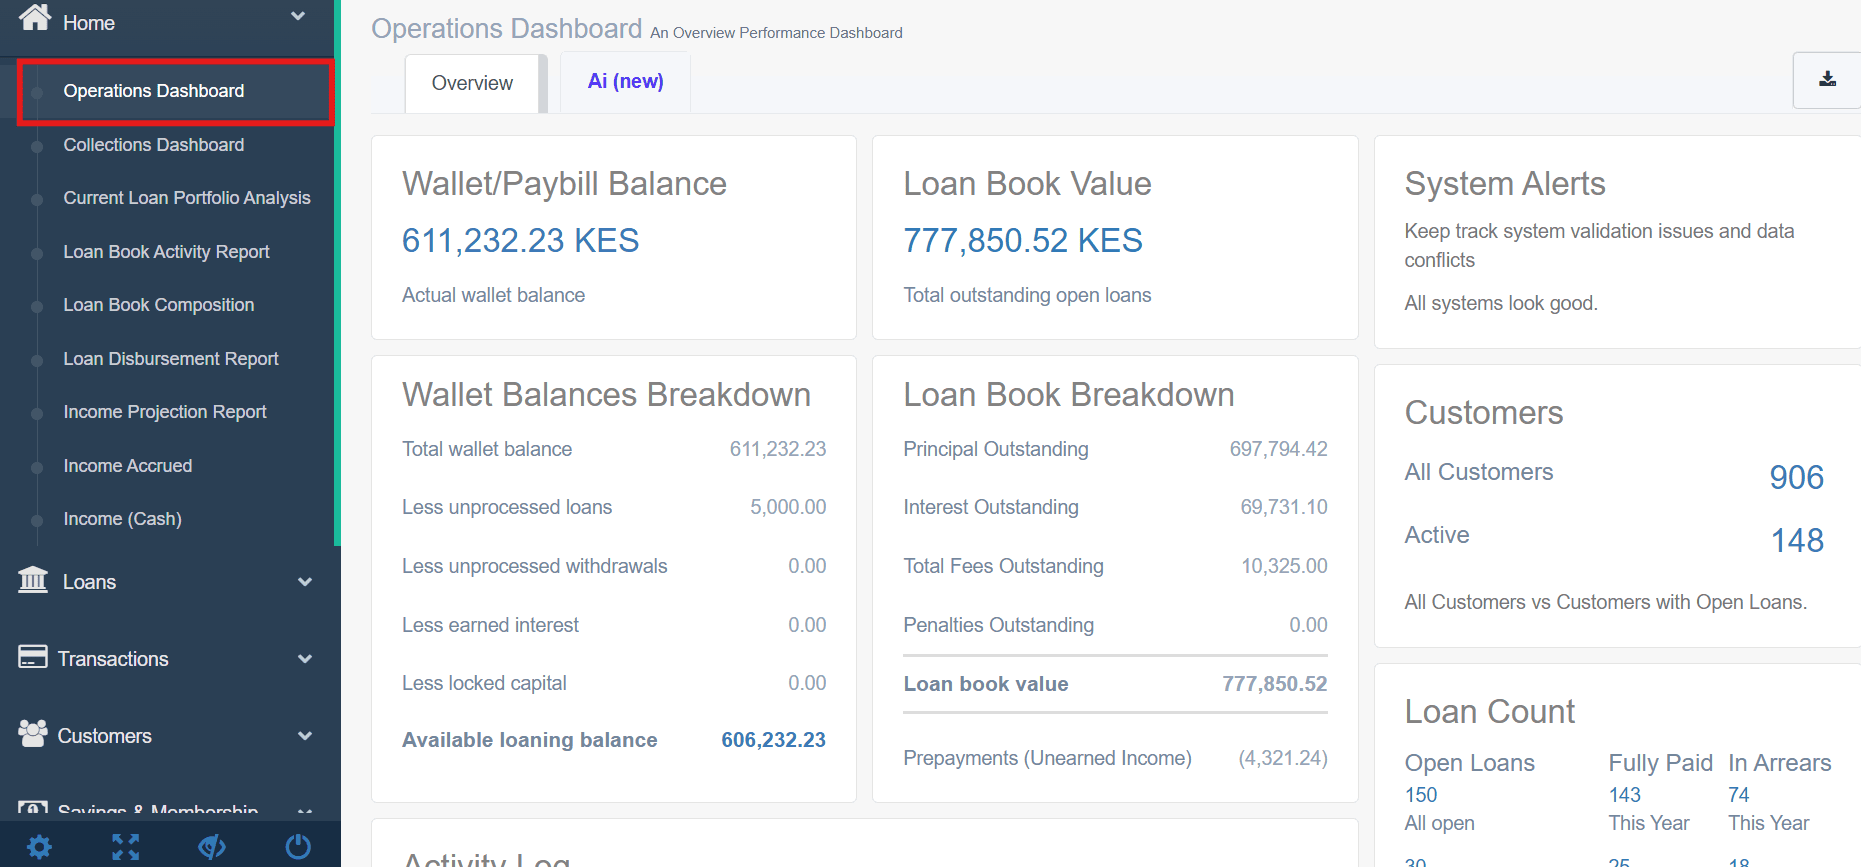
Pro-Tip: Check your Home Dashboard for high-level "glance" reports like Loan Book Composition and Current Portfolio Analysis. These are perfect for a quick morning status check.
Can we integrate with accounting systems (e.g., Zoho Books)?
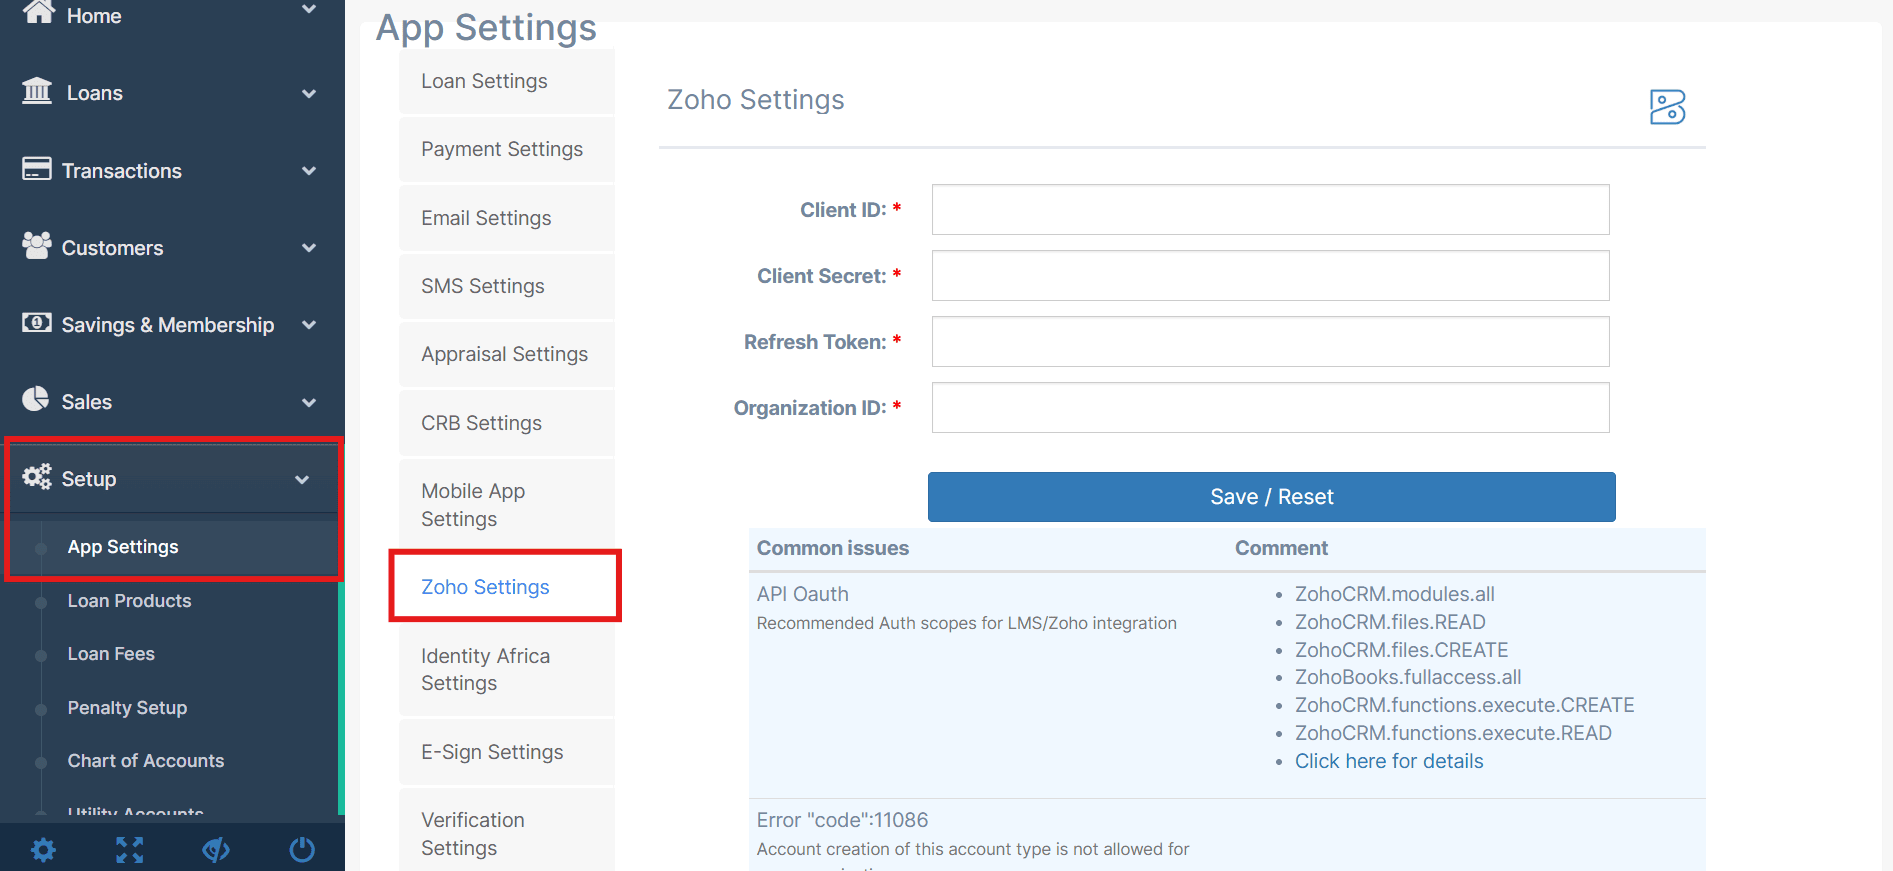
Yes. Presta has a native integration built for Zoho. Go to Setup > App Settings > Zoho Settings to link the LMS to Zoho Books or Zoho CRM. Once connected, your financial data syncs automatically, and any leads from Zoho CRM will show up in your Loan Listing with a "ZOHO-CRM" source tag.
How do we reconcile transactions?
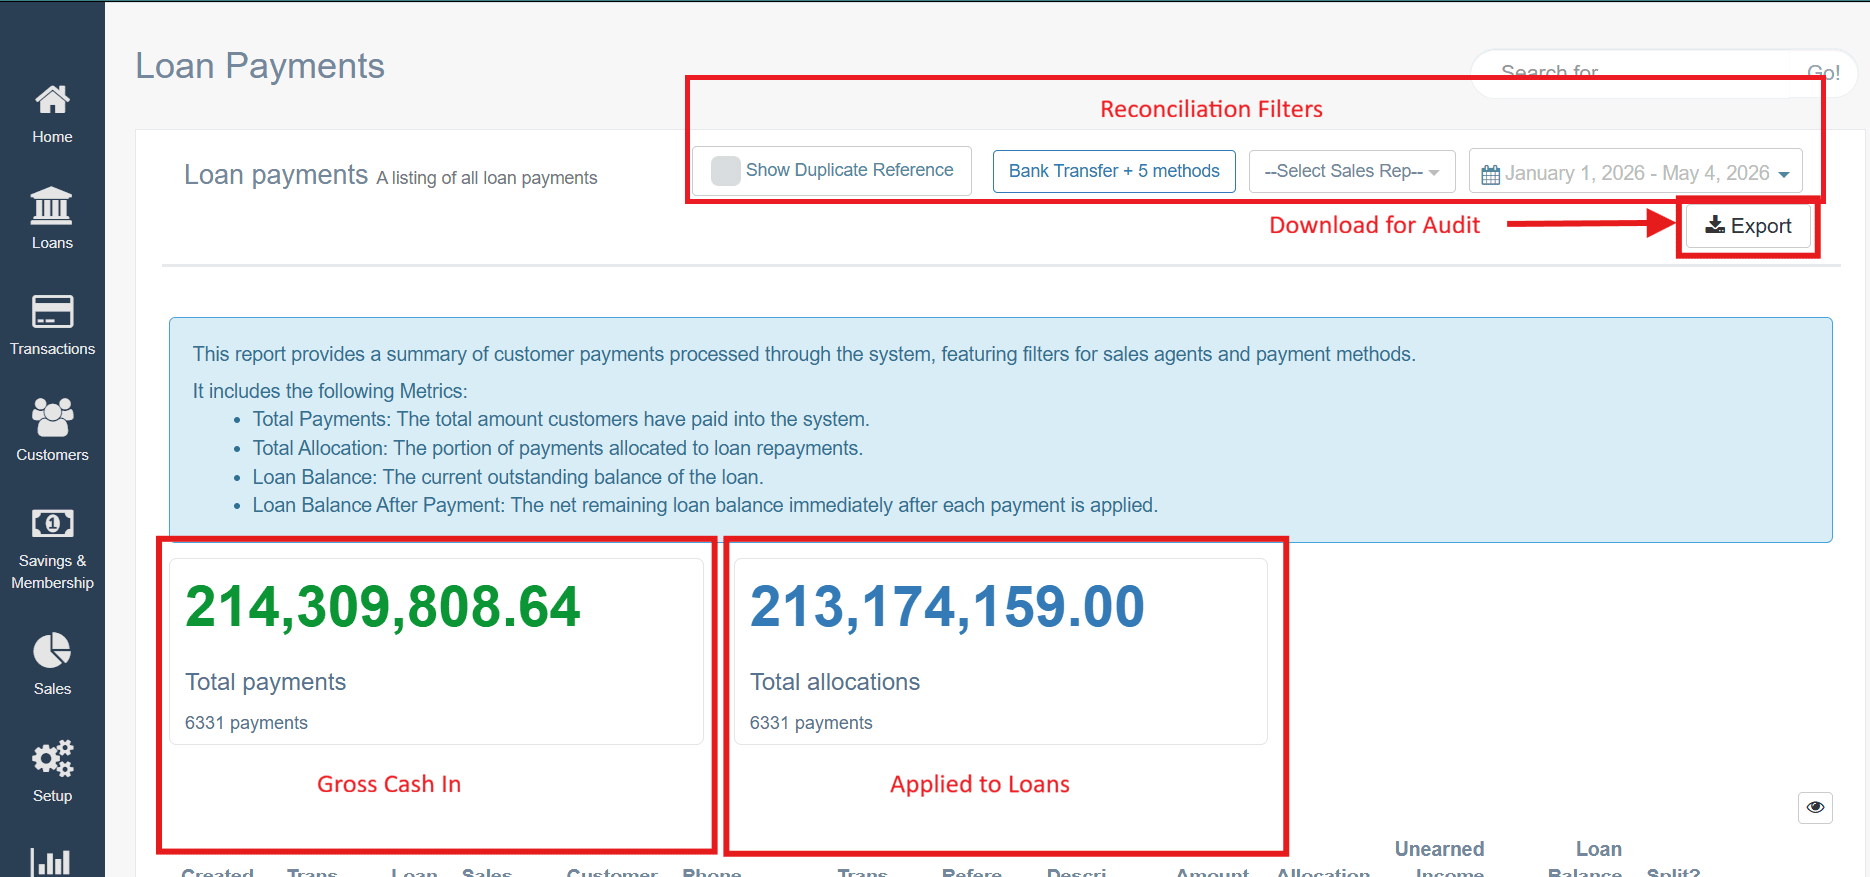
Transaction reconciliation is managed primarily through the Transactions section of the LMS. By navigating to Loan Payments, you get a real-time summary of all customer funds entering the system.
Key Reconciliation Tools:
- Total Payments: This shows the gross amount paid into the system by your customers.
- Total Allocations: This represents the actual amount that has been applied toward loan repayments. A difference between "Total Payments" and "Total Allocations" usually indicates unallocated funds or over payments that need to be reviewed.
- Flexible Filtering: You can filter these records by Payment Method (e.g., Bank Transfer, M-Pesa), Date Range, or specific Sales Representatives to match your external statements.
- C2B vs. B2C: For mobile money specifically, incoming payments are tracked under C2B (In), while all loan disbursements are tracked under B2C (Out).
7. Channels (Mobile App, USSD, Web)
What channels are supported (App, USSD, Web)?
Content to be added.
Can we brand the mobile app?
Content to be added.
How do we manage Play Store updates?
Content to be added.
Why are some changes requiring app approval?
Content to be added.
8. User Management & Security
How do roles and permissions work?
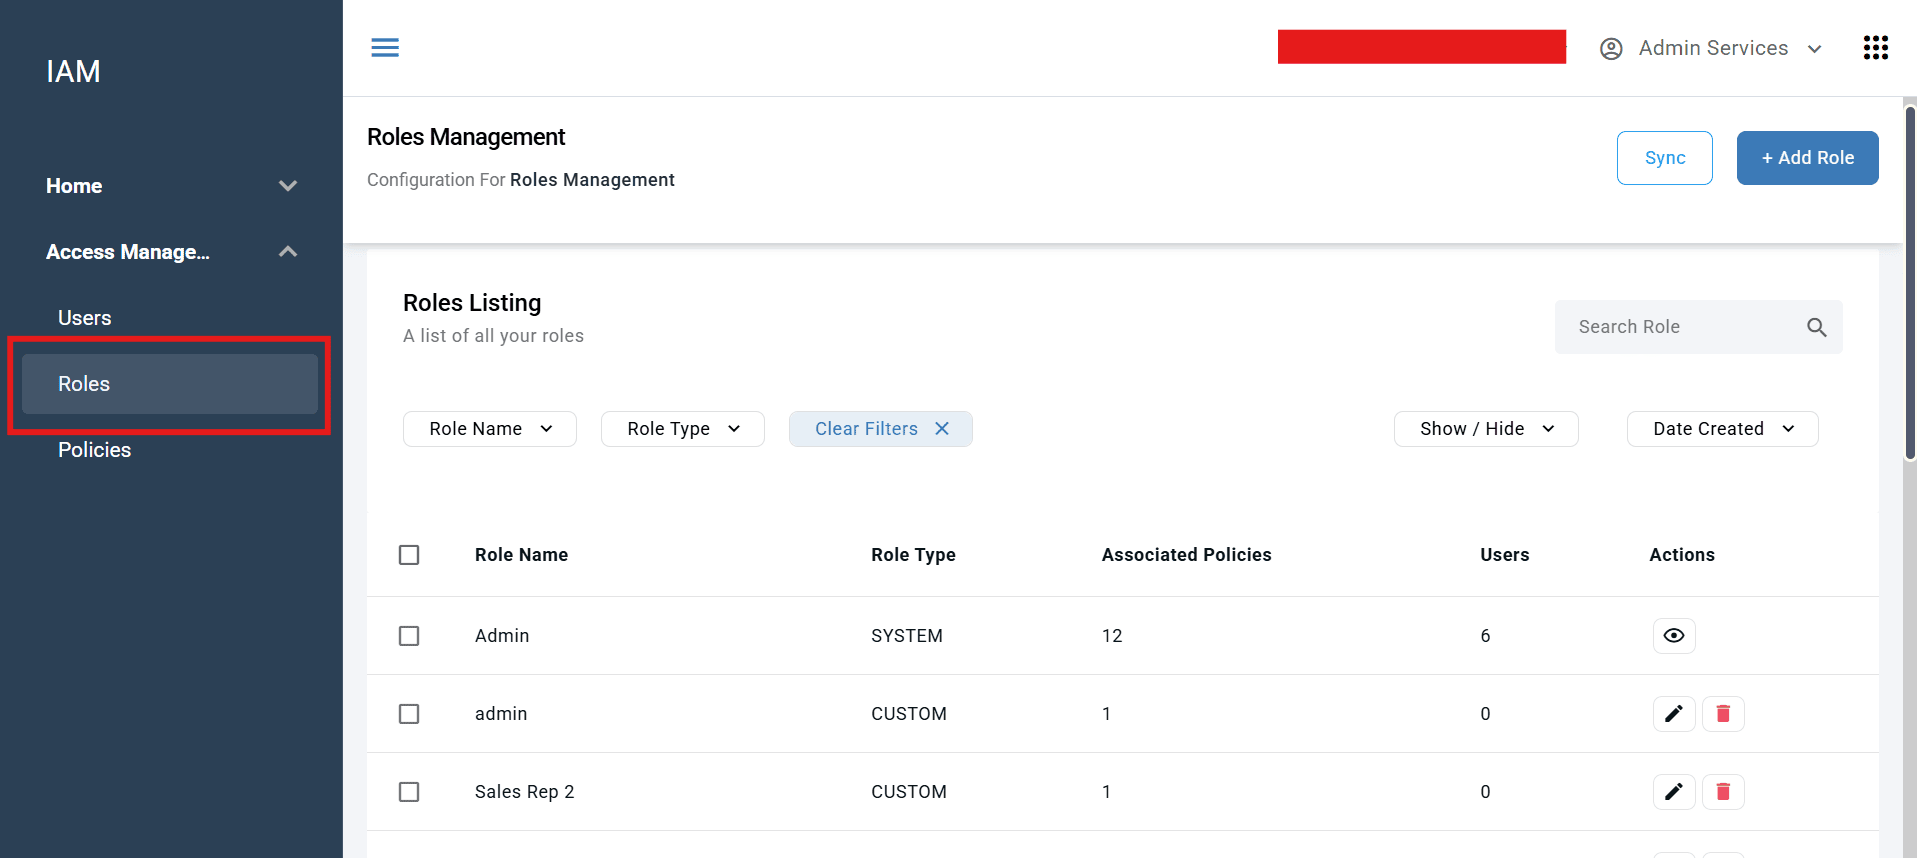
Roles act as a security filter, ensuring that staff members only interact with the tools and information necessary for their specific job functions. This "least privilege" approach prevents unauthorized access to sensitive financial or customer data.
- Role-Based Access Control (RBAC): Permissions are grouped into "Roles" (like Admin, Credit Officer, or Accountant). Instead of managing permissions for each individual person, you assign them a role that has a pre-defined set of "Policies" or rules.
- Customization: You can create Custom Roles (like "Nirvana Credit CEO" or "Ops Lead") that are unique to your organization's hierarchy.
- Audit Integrity: By restricting actions — such as limiting who can delete a record or approve a disbursement — you ensure that the system's audit trail remains clean and reliable.
Can we restrict access by branch?
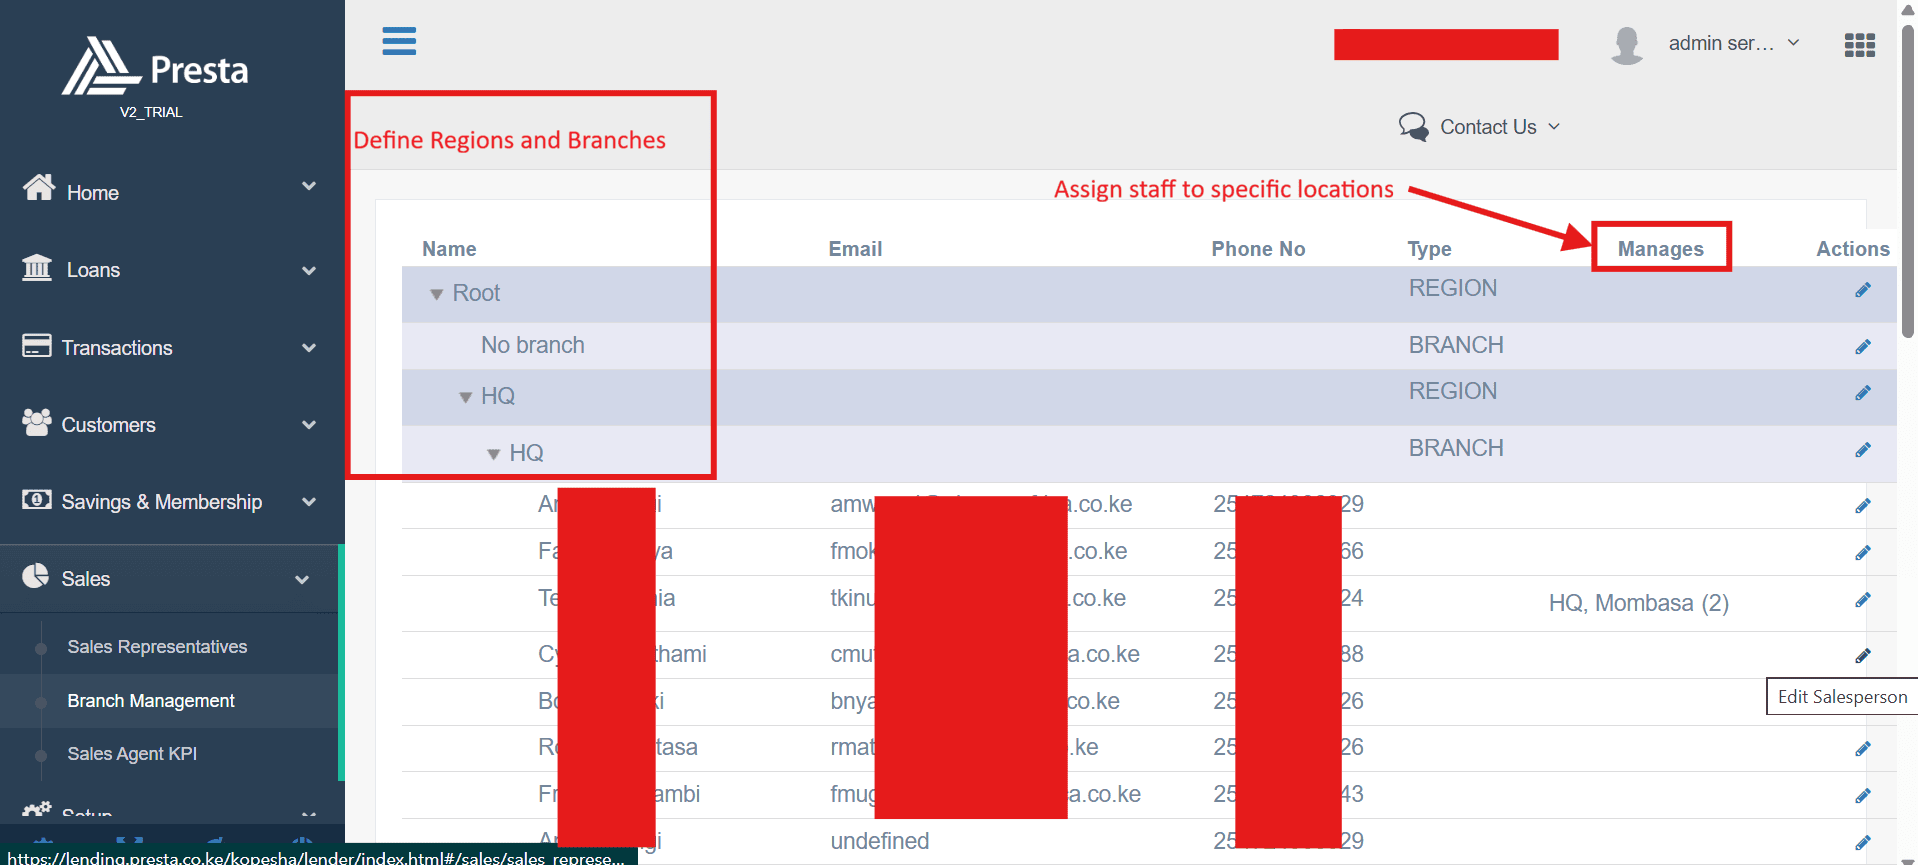
Yes. You can define your institutional hierarchy in Sales > Branches. Once set up, you can assign users to specific locations. This allows managers to use the Branch filter on the Loans Listing to monitor activity scoped only to their specific branch.
How is customer data secured?
Security is baked in at every level.
- HTTPS: All connections are encrypted and secure.
- RBAC: Role-Based Access Control keeps users in their own lanes.
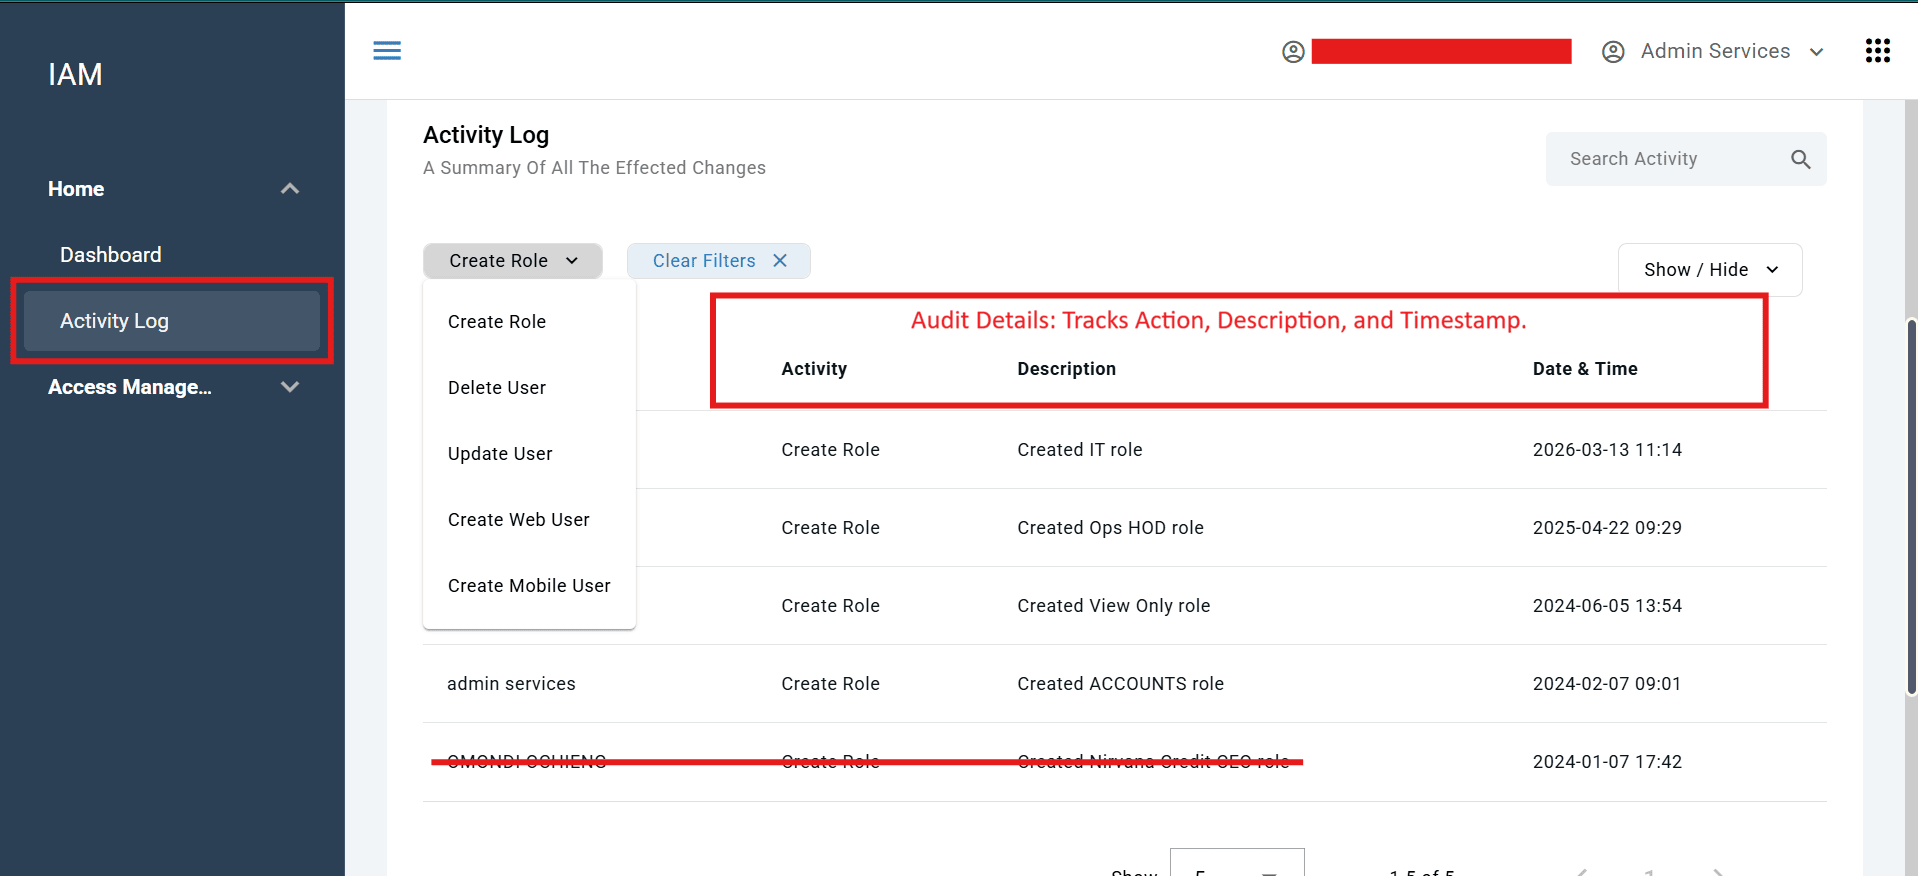
- Audit Trail: Every sensitive action, like changing a loan status, is logged in the IAM Activity Log so you always know who did what and when.
How do I reset a user's password if they are locked out?
If a staff member is stuck, an Admin can find them in the Users and Roles section and trigger a reset link. This sends an email to their registered address so they can set a new password.
Can we audit user activities to see who made specific system changes?
Yes. The Activity Log on IAM, Presta LMS dashboard provides a clear timeline of system changes, which is essential for both internal troubleshooting and external compliance audits.
Moreover there are audit trails on a loan and customer profile
9. Troubleshooting & Common Issues
Why is a loan not reflecting correctly?
If a loan seems "missing," don't panic. Check these four things first:
- Status: Is it still in Draft or Approval Pending? Check the specific tab in the Loans Listing.
- Filters: The system defaults to a specific date range. Clear your filters or expand the date window.
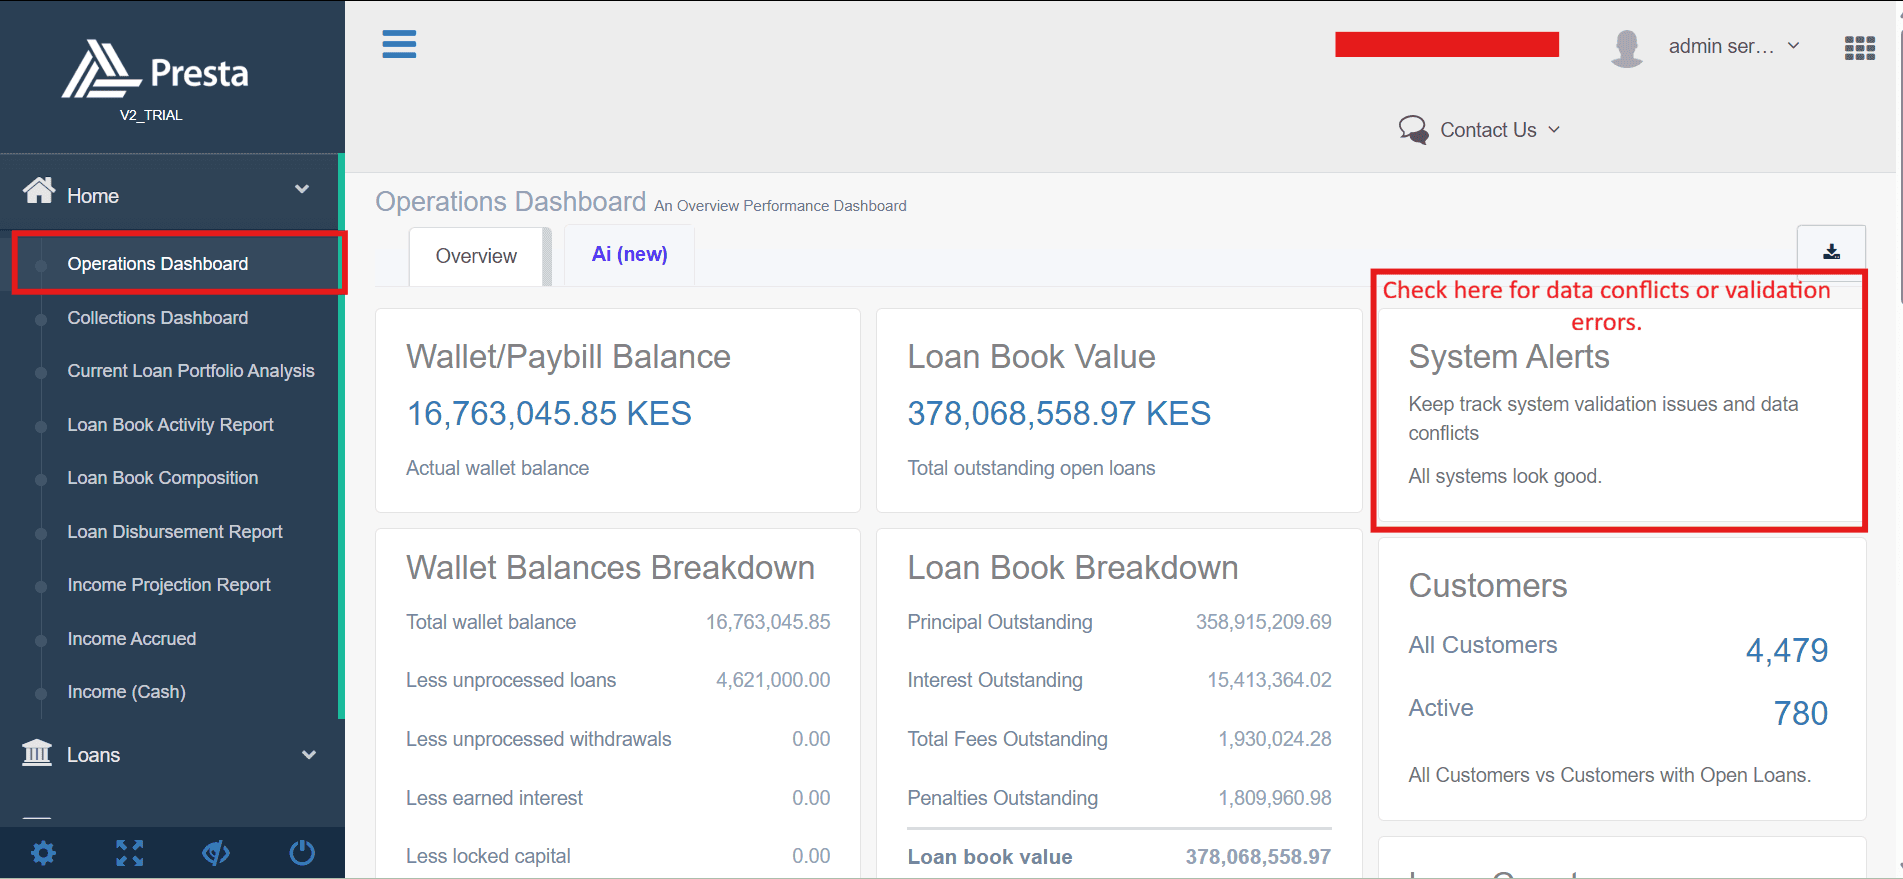
- Alerts: Check the System Alerts on your dashboard for data conflicts.
- Product Settings: Ensure the loan product itself hasn't been set to "Inactive."
Why are reports inconsistent?
Usually, this isn't a system bug; it's a timing issue.
- Date Mismatch: Ensure your start and end dates match exactly across the reports you are comparing.
- Unallocated Cash: If your P&L looks off, check Transactions > Loan Payments. If money was received but not "Allocated," it won't show up in the loan book properly.
What causes delays in loan processing?
If a loan is stuck, it's usually for one of these reasons:
- Awaiting Action: Someone in the approval chain hasn't clicked "Approve" yet.
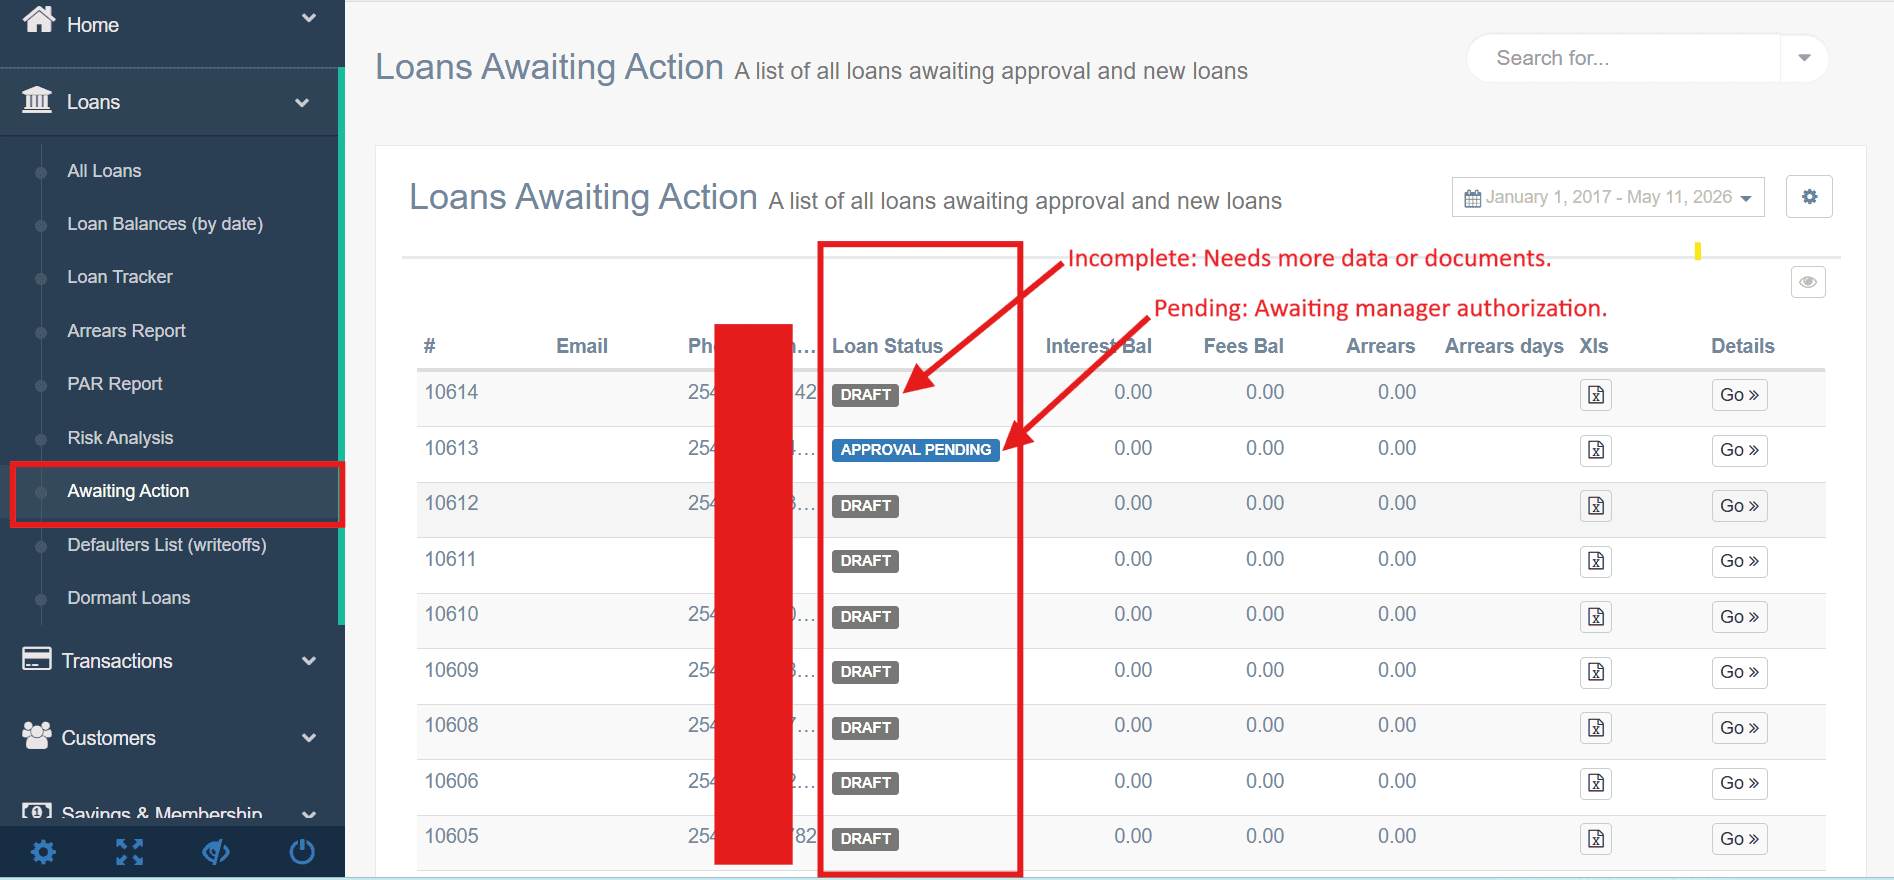
- Missing Data: Required documents (like an ID or PIN) weren't uploaded, keeping the loan in Draft.
- Empty Wallet: You can't disburse if your Presta Pay balance is too low.
- Network Errors: Mobile money (M-Pesa) might be down or the customer's phone number is typed incorrectly.
What should I do if a specific tile in the Portal is not opening?
- Refresh: The "turn it off and on again" of the web.
- Browser: Make sure you are using Google Chrome.
- Permissions: Check if your User Role actually has access to that specific module. If you aren't an Accountant, you might be blocked from the "Journal" tile.
What should we check before raising a support ticket?
Before contacting support, run through the following checklist:
- Check the System Alerts panel on the Operations Dashboard for known issues.
- Confirm your internet connection is stable.
- Try reproducing the issue in an incognito/private browser window.
- Verify that the affected user has the correct role and permissions.
- Note the exact steps that led to the issue and any error messages displayed.
- Check whether the issue affects all users or just one specific account.
10. Integrations
What systems can Presta integrate with?
Presta is designed to be the central hub for your financial operations. It connects to:
- Accounting & CRM: Zoho Books and Zoho CRM for syncing financial data and loan leads.
- Payments: M-Pesa and Bank channels for both receiving repayments (C2B) and sending out loans (B2C).
- Verification: Identity Africa for instant ID checks and CRBs for credit history.
- Credit Scoring: Third-party scoring tools that analyze mobile money statements to give you a risk profile.
How does API integration work?
If your institution uses a custom-built app or a specialized platform, Presta provides an API to bridge the two. The technical team handles the "handshake" during onboarding, providing the documentation and security credentials needed to keep the data flowing safely.
Do you support mobile money integrations (e.g., M-Pesa)?
Yes, fully. Both C2B (repayments) and B2C (disbursements) are supported natively. You don't have to manually check your Paybill; the transactions show up directly in the Transactions section as they happen.
Can we integrate with CRBs or third-party scoring systems?
Absolutely.
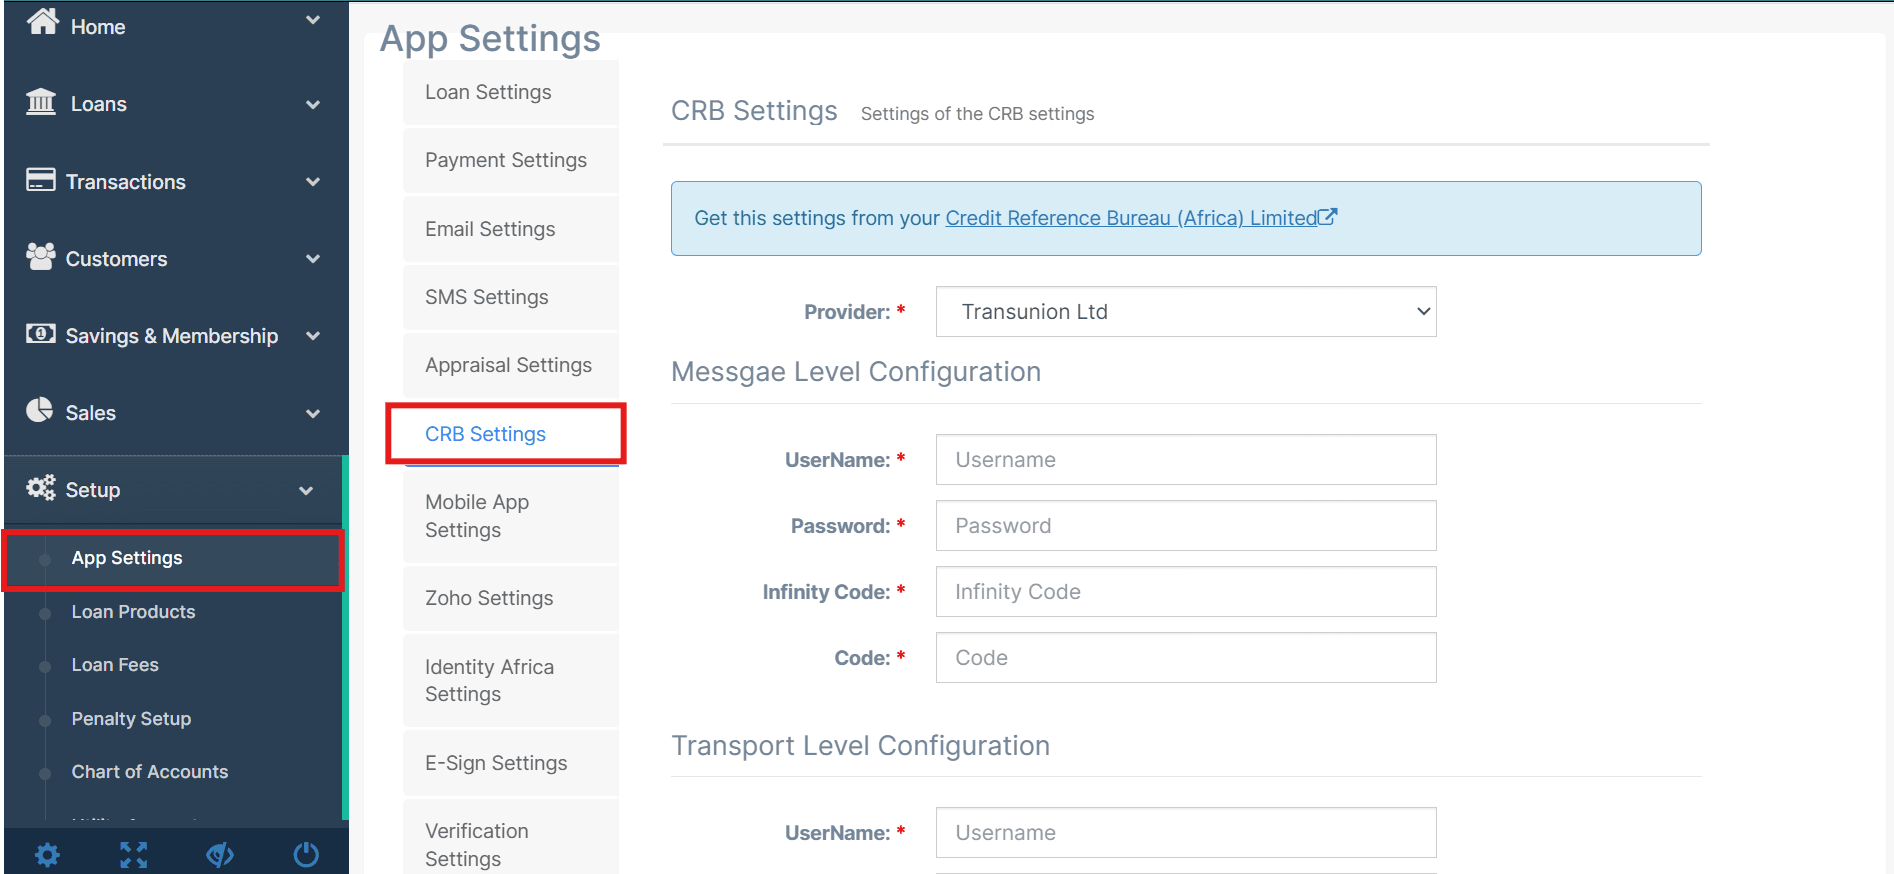
- CRB Checks: These are configured in Setup > App Settings > CRB Settings. Once active, you can pull credit reports during the appraisal process.
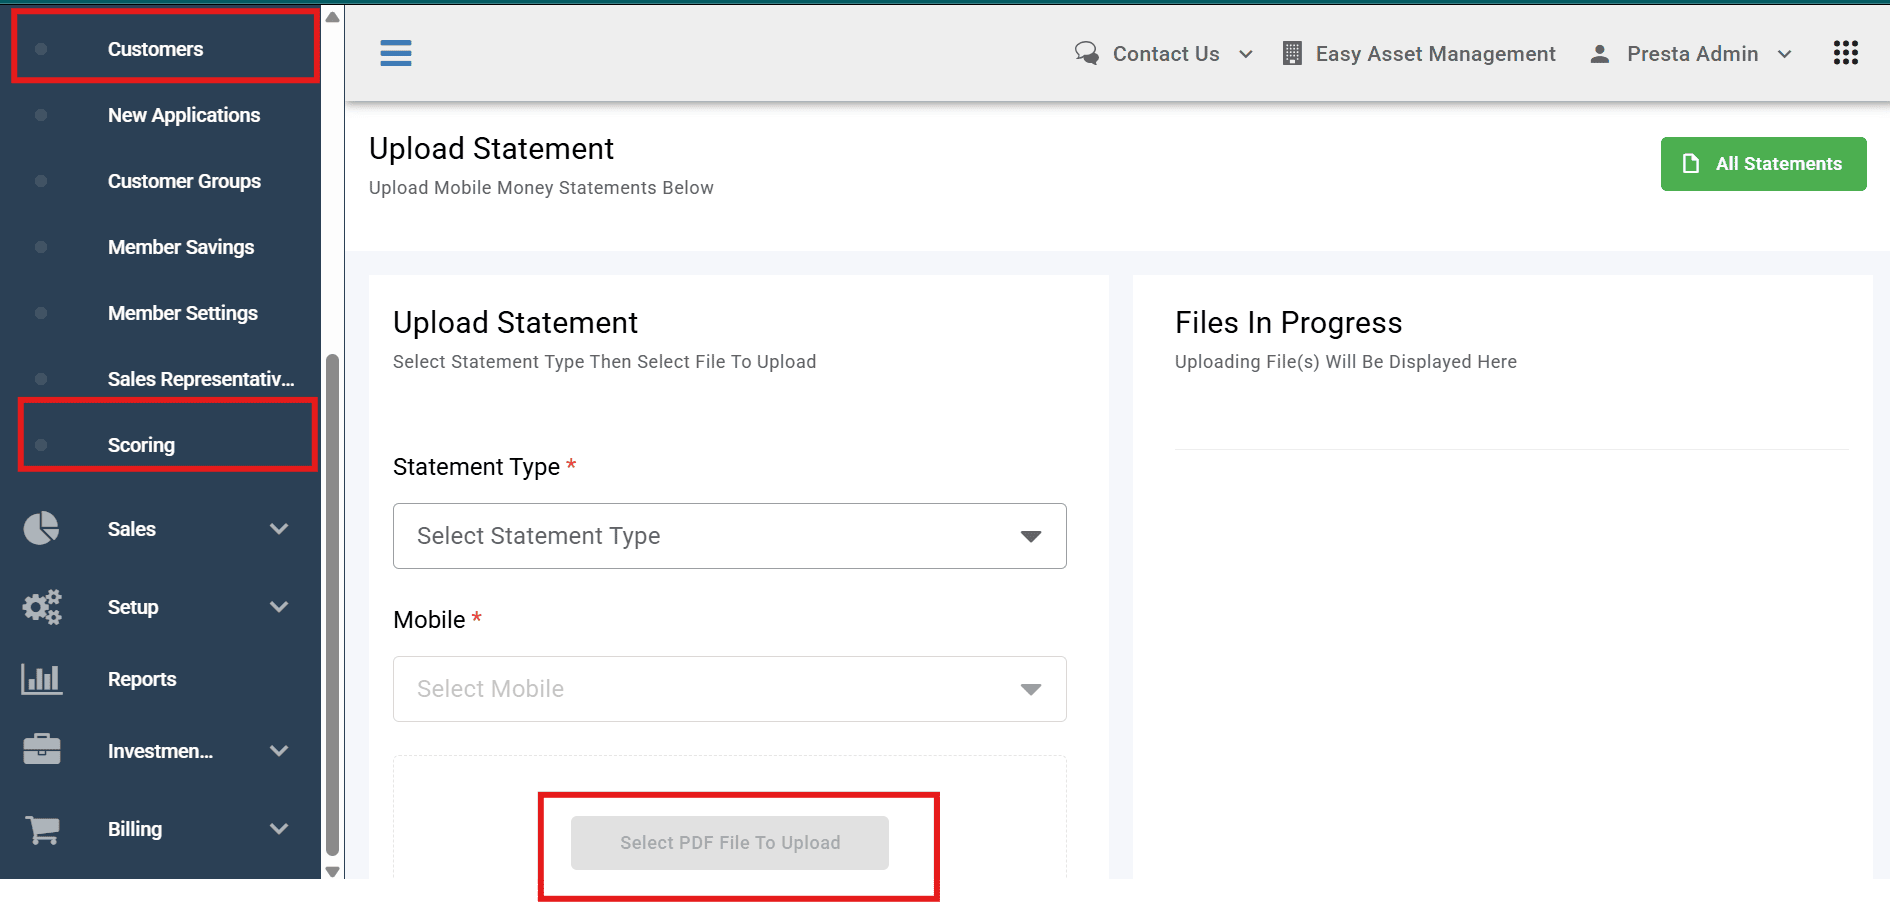
- Statement Scoring: Under Customers > Scoring, you can upload a customer's mobile money statement (PDF). The system analyzes the cash flow and gives you an automated score to help you decide on the loan.
11. Support & SLA
How do we contact support?
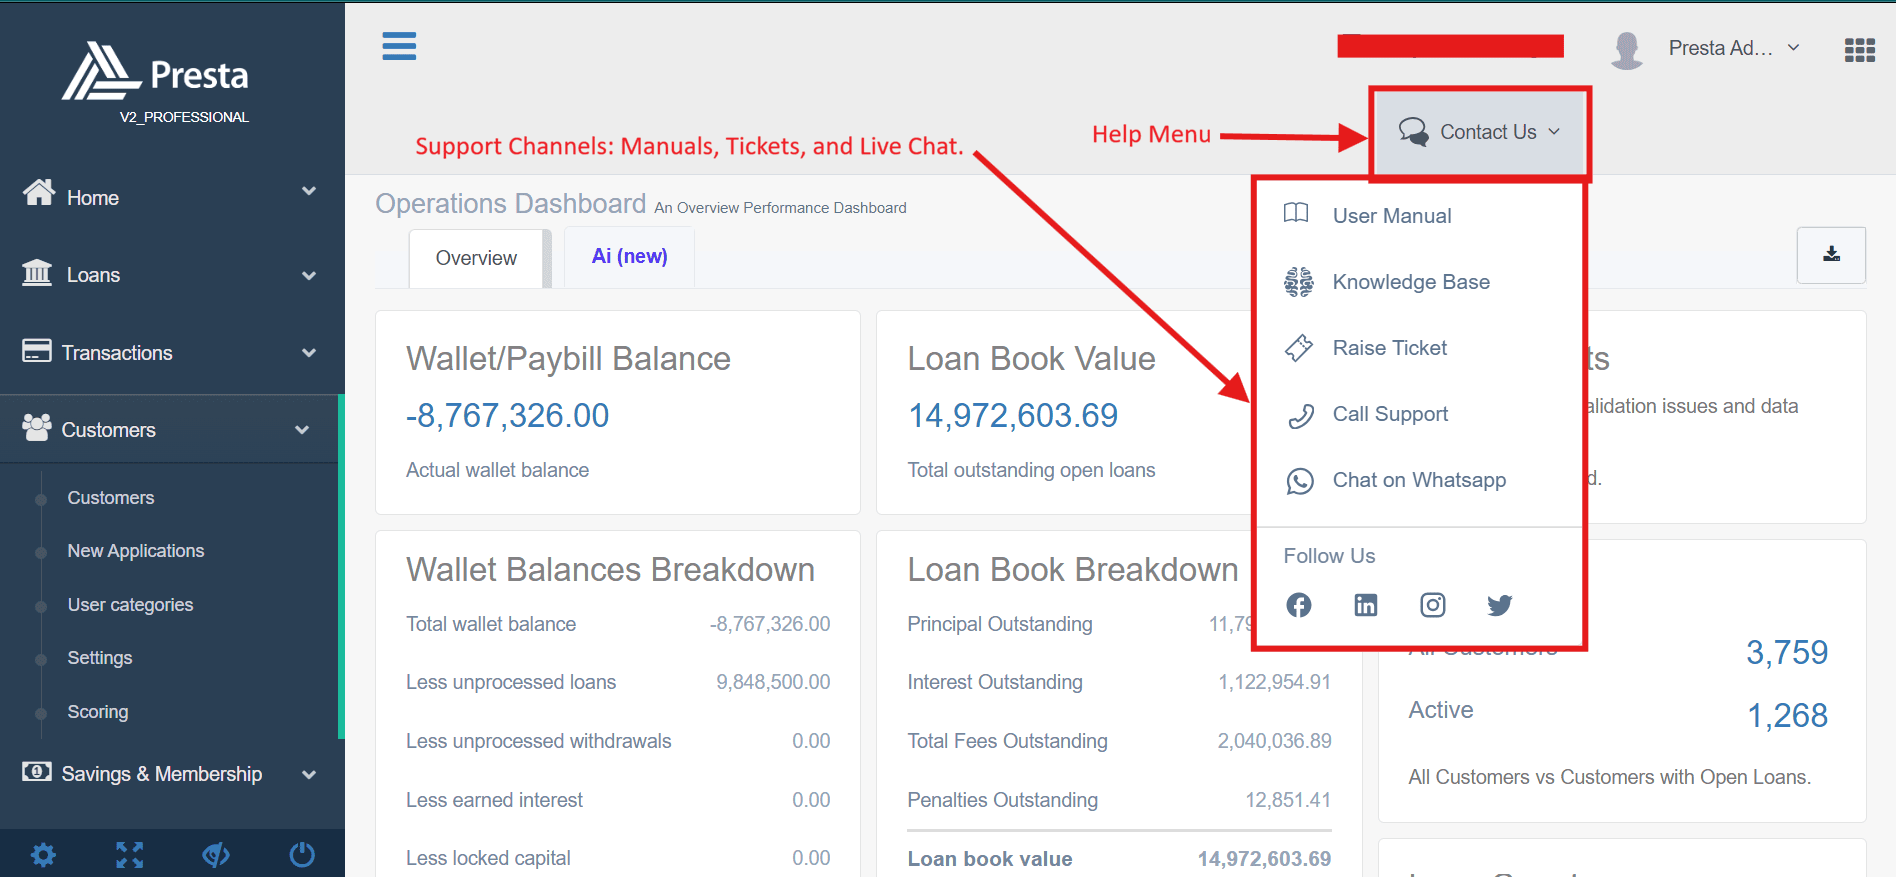
Help is always one click away. At the top of every screen in the LMS, you'll find the "Contact Us" dropdown. This is your portal to:
- Submit a support request.
- Start a chat with the technical team.
- Access the Help Center for guides and tutorials.
What information should we provide when logging an issue?
To resolve your issue quickly, include:
- Institution & User: Your organization's name and the affected account.
- Location: The specific module (e.g., Loans > Loan Listing).
- Description: What you tried to do versus what actually happened.
- Error Details: The exact error message (a screenshot is highly recommended).
- Timestamp: The date and time the issue occurred.
- Impact: Whether this affects all users or just one specific person.
Where can I access the Presta Help Center to read guides and articles?
Access these directly via the "Contact Us" menu:
- User Manual: For a structured guide to system features.
- Knowledge Base: For searchable how-to articles and reference documentation.
How do I check the progress of a support request?
You will receive an acknowledgment with a reference number once a ticket is submitted. Use this to follow up via email or the support portal. Urgent issues can be escalated through your dedicated account contact.
What are the response and resolution timelines?
Response and resolution timelines are defined in your institution's Service Level Agreement (SLA). Typically, critical issues affecting live transactions receive the fastest response. Contact your account manager or review your onboarding agreement for the specific SLA tiers applicable to your institution.
How are critical issues handled?
Critical issues such as system downtime, failed disbursements affecting multiple customers, or security incidents are escalated immediately to the Presta technical team. You should report such issues through the Contact Us menu and mark them as urgent. Your dedicated account contact is also available for escalation outside of standard support channels.
Who is my primary contact for account-related (non-technical) queries?
Each institution is assigned a dedicated Account Manager during onboarding. This person handles billing queries, subscription changes, and general account management. Their contact details are shared at the start of your engagement with Presta. For billing specifically, your invoices and payment history are also accessible under the Billing section of the LMS.